Standing in the Dark, Waiting
You have driven two hours from Reykjavik into absolute darkness. The forecast said KP 4. The sky is clear. Your camera is mounted on a tripod with a 14mm f/2.8 pointed north. Your fingers are going numb inside chemical hand warmers. You have been waiting forty-five minutes and the sky shows nothing but stars.
Then a faint greenish glow appears on the northern horizon. It could be a cloud. It could be light pollution from a distant town. You take a test shot at ISO 6400 and 20 seconds. On your LCD, the glow is unmistakably green, and it is moving. The aurora is starting.
This is the moment that makes or breaks aurora photography. Your settings need to be ready before the show begins, because the northern lights do not wait for you to figure out your camera. This guide prepares you for that moment and every intensity level that follows.

Photo: Ronald Soethje
Understanding Aurora Activity: The KP Index
The KP index measures geomagnetic disturbance on a scale from 0 to 9. It is the single most important number for aurora photographers because it determines both the visibility and the behavior of the aurora, which in turn dictates your camera settings.

What the Numbers Mean for Photographers
- KP 0-2: Faint aurora, visible only from within or very near the Arctic Circle (above 65 degrees N). Appears as a diffuse green glow on the northern horizon. Barely visible to the naked eye but clearly visible on camera with long exposure.
- KP 3-4: Good displays in Iceland, northern Norway, Finland, and Alaska. Defined bands and curtains of green, sometimes with purple edges. This is the most common level during active aurora season and produces the majority of strong aurora photographs.
- KP 5-6: Geomagnetic storm. Bright, dynamic aurora with rapid movement. Visible as far south as Scotland and southern Scandinavia. Colors intensify: vivid greens, strong purples, occasional reds. These events produce the most dramatic images.
- KP 7-9: Severe to extreme geomagnetic storm. Aurora visible at latitudes as low as 40 degrees N. Corona formations (overhead aurora radiating from a central point) are common. These events are rare, perhaps once or twice per solar cycle, and they produce the photographs that define careers.
Solar Cycle and Current Conditions
The sun operates on an approximately 11-year activity cycle. Solar Maximum, the peak of this cycle, occurred in 2024-2025 and activity remains elevated through 2026. This means aurora frequency and intensity are significantly higher than average. If there was ever a time to plan an aurora photography expedition, it is now.
Monitor forecasts at NOAA’s Space Weather Prediction Center (swpc.noaa.gov) and use apps like My Aurora Forecast or Aurora Alerts for real-time KP notifications.
Essential Gear
Camera Body Requirements
Aurora photography is one of the most demanding tests of a camera’s high-ISO performance. You need:
- Full-frame sensor: The larger photosites gather more light, producing cleaner files at ISO 3200-6400. APS-C and Micro Four Thirds sensors work but produce noticeably more noise.
- Manual exposure control: Full manual mode is non-negotiable. Auto exposure will fight you constantly in the dark.
- Good high-ISO performance: You need usable files at ISO 3200 minimum. Modern full-frame bodies from Sony, Nikon, and Canon all deliver here.
- Reliable battery performance in cold: Some cameras drain batteries dramatically faster in sub-zero temperatures.
Lens Selection
Your lens matters more than your body for aurora photography. The critical specifications:
- Focal length: 14mm to 24mm. Wider is generally better for sweeping aurora displays, but 20-24mm works well for overhead corona events.
- Maximum aperture: f/2.8 or faster. An f/1.4 lens gives you two full stops more light than f/2.8, which translates to cleaner files or faster shutter speeds. This advantage is substantial.
- Manual focus capability: Autofocus cannot function in darkness. You need a lens with a smooth, precise manual focus ring.
Recommended Lenses (in Priority Order)
| Lens |
Aperture |
Why It Excels |
| Sigma 14mm f/1.8 Art |
f/1.8 |
Widest fast ultra-wide available, exceptional sharpness wide open |
| Sony 14mm f/1.8 GM |
f/1.8 |
Lighter than Sigma, superb corner performance |
| Nikon 14-24mm f/2.8 S |
f/2.8 |
Zoom flexibility, outstanding across range |
| Canon RF 15-35mm f/2.8 |
f/2.8 |
Versatile zoom, strong weather sealing |
| Samyang/Rokinon 14mm f/2.8 |
f/2.8 |
Budget option, surprisingly capable |
Camera Settings by Aurora Intensity
The single biggest mistake aurora photographers make is using the same settings for every intensity level. A faint KP 2 aurora and a dancing KP 7 corona require fundamentally different approaches.

Faint Aurora (KP 0-2)
- Aperture: Wide open (f/1.4 to f/2.8)
- ISO: 3200 to 6400
- Shutter: 20 to 25 seconds
Maximize light gathering. The aurora is dim and slow-moving at this level, so longer exposures work without blurring the aurora structure. You are fighting to capture enough light, and noise is an acceptable trade-off.
Moderate Aurora (KP 3-4)
- Aperture: f/2.8
- ISO: 1600 to 2500
- Shutter: 10 to 15 seconds
The aurora is bright enough to reduce ISO and shorten exposure. This produces cleaner files while still capturing defined bands and curtains. If the aurora is moving quickly within a KP 3-4 event, lean toward 8-10 seconds to preserve structure.
Active Aurora (KP 5-6)
- Aperture: f/2.8
- ISO: 1600
- Shutter: 6 to 10 seconds
Bright, moving curtains demand shorter exposures. At 15 seconds, an active aurora blurs into a featureless green smear. At 6-8 seconds, you capture the individual folds and ripples in the curtains. This is where many photographers lose their best shots by keeping shutter speeds too long.
Storm/Corona Aurora (KP 7+)
- Aperture: f/2.8
- ISO: 2500 to 3200
- Shutter: 2 to 5 seconds
During a corona event, the aurora dances overhead with explosive speed. Exposures longer than 5 seconds turn this spectacle into a washed-out blur. Raise ISO to compensate for the short shutter speed. The noise from ISO 3200 is far less damaging to the image than motion blur from a 15-second exposure of fast-moving aurora.
The critical principle: as the aurora gets brighter and faster, shorten your shutter speed. Bright aurora does not need long exposures. Fast aurora cannot tolerate them.
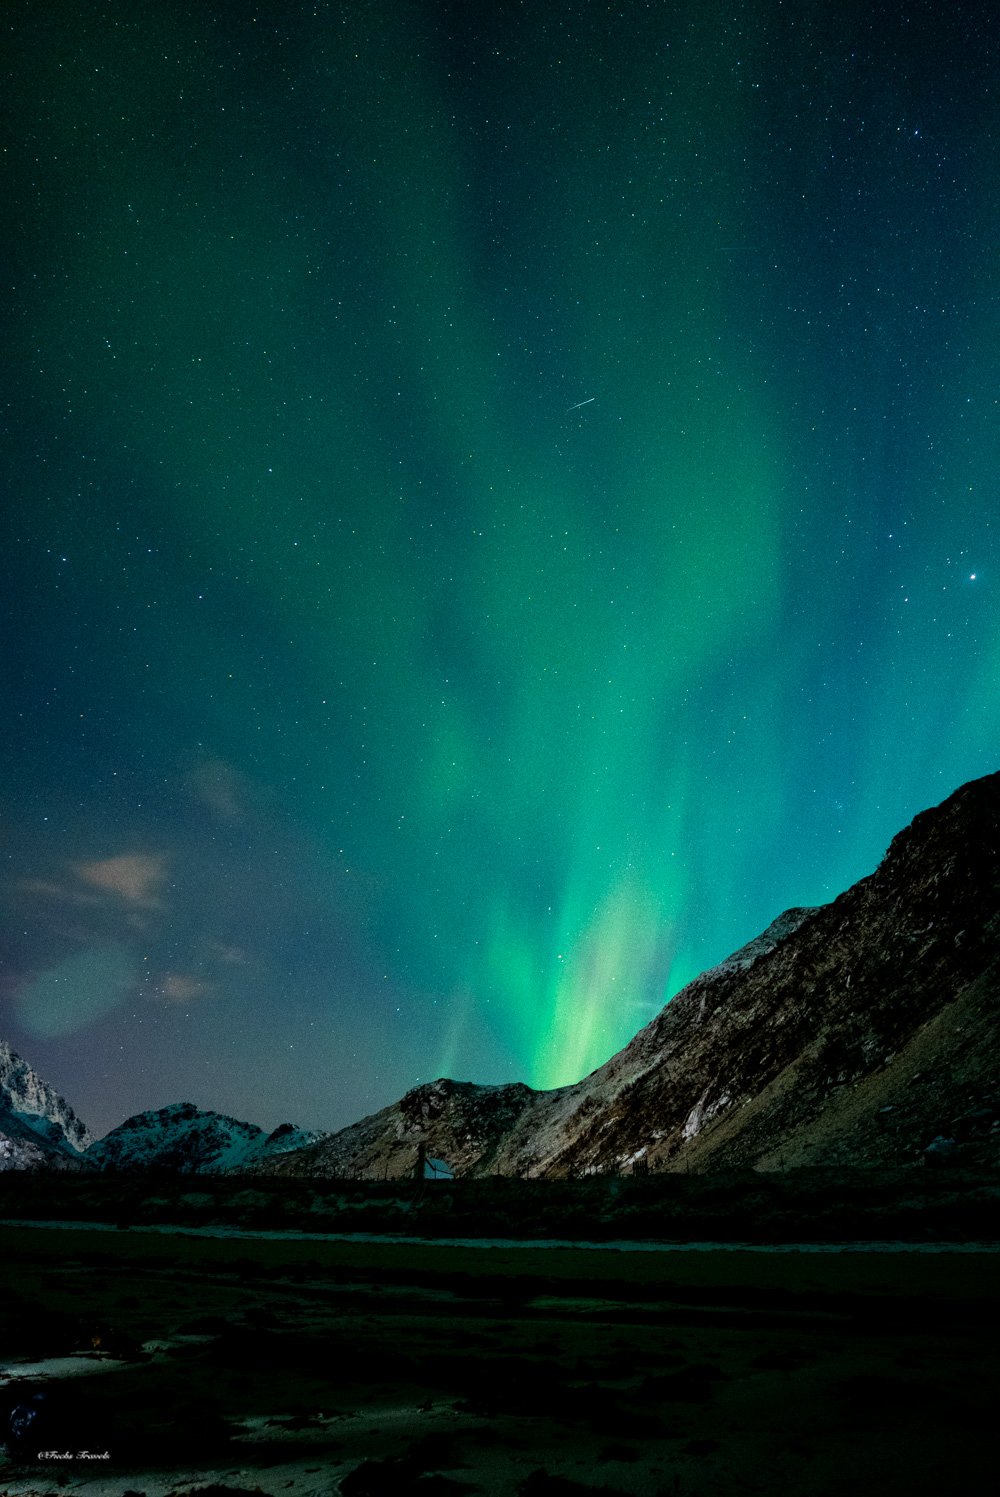
Photo: Amin Ghadersohi
Focus Techniques in Darkness
Focusing in total darkness is the technical challenge that defeats the most photographers on their first aurora trip. Autofocus simply will not work. You need a reliable manual focus method, tested and practiced before you arrive in the field.

Method 1: Bright Star Focus (Most Reliable)
- Switch to Live View on your camera’s rear LCD.
- Point at the brightest star visible (Jupiter, Sirius, or Vega work well).
- Zoom to maximum magnification (10x on most cameras).
- Turn the manual focus ring slowly until the star contracts to the smallest possible pinpoint.
- Lock the focus ring with tape.
This method works in all conditions and produces the most precise results. Practice it during daylight by focusing on a distant bright point to build muscle memory.
Method 2: Pre-Focus in Daylight
During daylight, autofocus on a distant mountain or horizon (at least 500 meters away). Switch to manual focus without touching the focus ring. Apply a strip of gaffer tape over the focus ring to prevent accidental movement. Verify focus has not shifted after traveling to your night location.
Method 3: Infinity Mark (Least Reliable)
Some lenses have an infinity mark on the focus scale. Set the ring to infinity and back off slightly. The problem: many modern lenses allow focus past infinity, so the infinity mark is only approximate. Use this method only as a last resort, and always verify with a test shot of stars at 100% zoom.
White Balance for Aurora
Recommended: 3200K to 3800K.
Auto white balance typically adds too much warmth to aurora images, shifting the greens toward yellow. Setting a manual color temperature of 3400K produces natural-looking green aurora with accurate purple and red tones.

Shooting RAW lets you adjust white balance freely in post-processing, so this is not a critical decision. But getting it close in-camera means your LCD review accurately represents what you are capturing, which helps you evaluate composition and exposure in the field.
Composition Strategies

Photo: Amin Ghadersohi
The Foreground Is Half the Image
An aurora filling the sky is visually spectacular but photographically incomplete without foreground context. The aurora provides the drama; the foreground provides the story. Every strong aurora photograph includes compelling foreground interest:
- Mountains and ridgelines: Silhouetted against the aurora, they provide scale and location context.
- Still water for reflections: A calm lake or fjord doubles your aurora, creating symmetry and depth. Scout these locations during daylight.
- Isolated structures: A church, cabin, lighthouse, or boat anchors the composition and gives the viewer a human-scale reference point.
- Rock formations: Interesting geological features in the foreground add texture and contrast to the smooth aurora sky.
The Reflection Shot
Still water reflecting the aurora is the most sought-after composition in aurora photography. Finding it requires scouting during daylight: look for small lakes, calm fjord inlets, or tidal pools away from wind exposure. Even a large puddle can work if positioned correctly.
The technical challenge: your exposure must balance the bright aurora sky with the dimmer reflection. Expose for the sky and accept that the reflection will be 1-2 stops darker. Do not try to lift the reflection to match the sky in post-processing; the natural brightness difference looks more authentic.
Vertical vs. Horizontal
Do not neglect vertical compositions. Corona aurora displays extend directly overhead, and horizontal framing cuts off the most dramatic part of the show. When the aurora goes overhead, rotate your camera 90 degrees and point slightly above the horizon to capture both the foreground and the zenith.
Cold Weather Survival
Battery Management
Cold temperatures devastate battery performance. Lithium-ion batteries lose capacity rapidly below 0 degrees C and can die completely at -20 degrees C. Prepare accordingly:
- Carry a minimum of 4 to 6 fully charged batteries.
- Keep spare batteries in an inside jacket pocket, against your body warmth.
- When a battery dies in the cold, swap it for a warm one. Place the dead battery in your warm pocket; it will recover partial charge as it warms.
- A battery grip doubles your capacity and reduces swap frequency.
Condensation Prevention
The most common equipment-destroying mistake: bringing a cold camera directly into a warm room. Warm, humid indoor air condenses instantly on the cold camera body, lens elements, and most critically, internal electronics and the sensor.

The prevention protocol:
1. Before entering any warm space, seal your camera in a large ziplock bag or dry bag.
2. Squeeze out excess air and seal completely.
3. Bring the sealed bag indoors and leave it untouched for 30 to 45 minutes.
4. Condensation forms on the outside of the bag instead of on your camera.
5. Open the bag only after the camera has reached room temperature.
This is not optional. A single condensation event can fog internal lens elements for days or cause corrosion on electronic contacts.
Personal Comfort Gear
You will stand motionless in sub-zero temperatures for hours. Your comfort directly affects your concentration, your patience, and therefore your photographs.
- Layered clothing system: Base layer (merino wool), insulation layer (down or synthetic), shell layer (windproof, waterproof).
- Chemical hand warmers: Place inside mittens. Heated glove liners are a worthwhile investment for dedicated aurora photographers.
- Insulated boots rated to -30 degrees C: Your feet lose heat fastest. Do not underestimate this.
- Balaclava or neck gaiter: Protecting your face from wind makes the difference between staying out another hour and retreating to the car.
Best Locations Worldwide
Iceland
The most accessible aurora destination with the most diverse foreground options. Combine aurora shooting with waterfalls, glaciers, and volcanic landscapes during daylight hours. Season: September through March. Key advantage: the entire country sits within the aurora zone, so you can chase clear skies by driving to different regions.
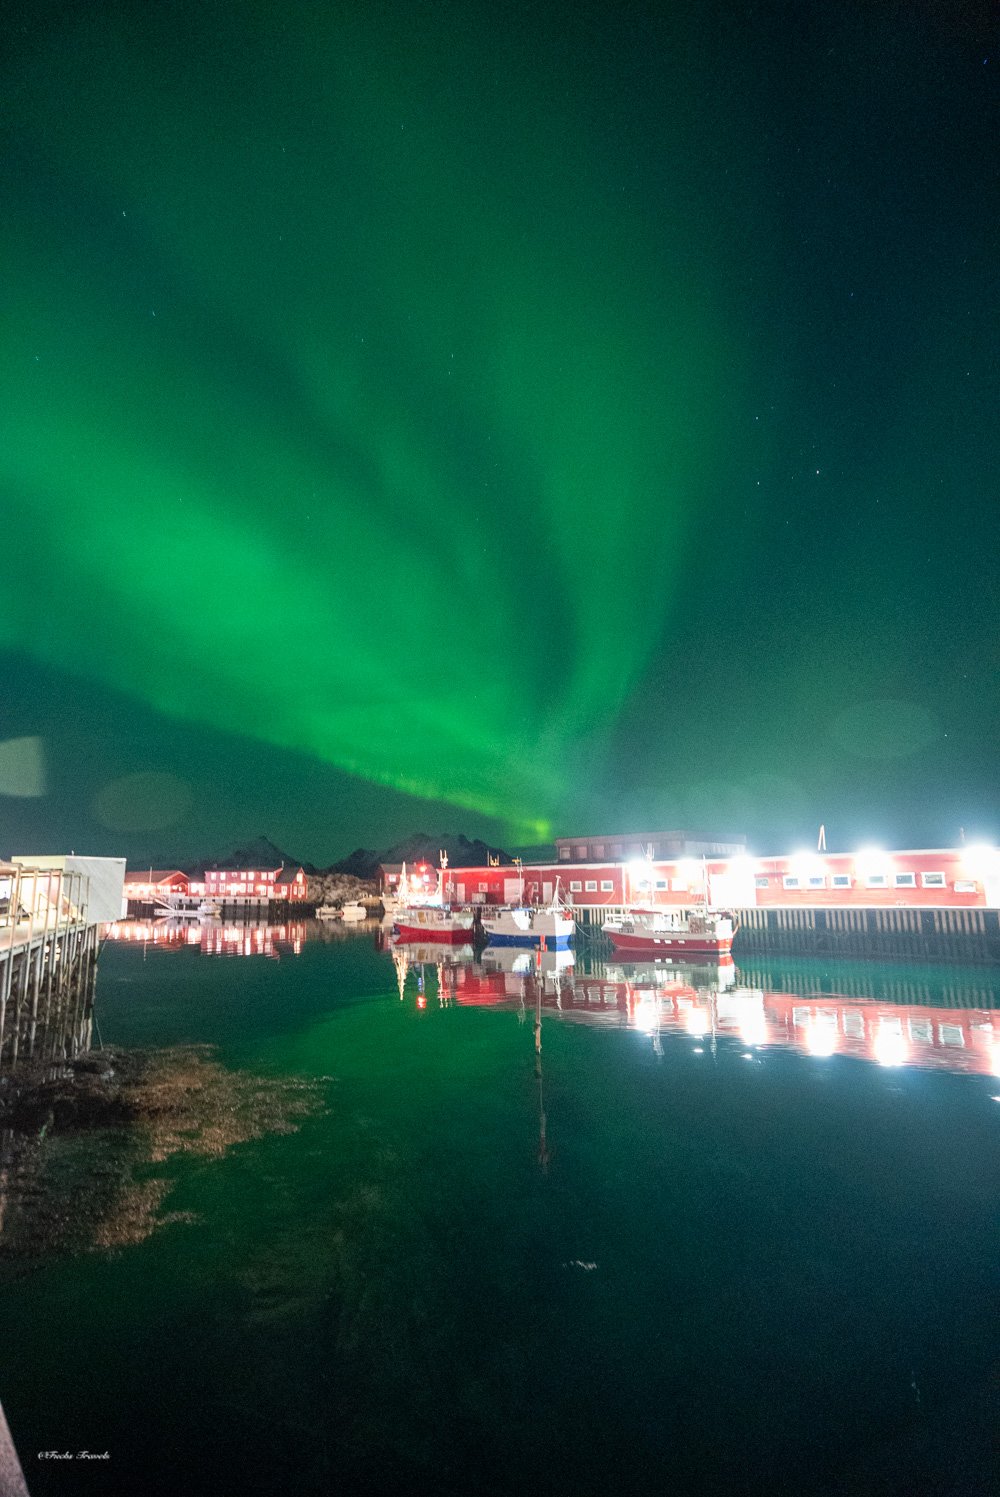
Photo: Amin Ghadersohi
Norway (Tromso and Lofoten)
Tromso sits at 69 degrees N, deep in the aurora zone. The Lofoten Islands add dramatic fjord compositions. Season: September through March. Key advantage: reliably strong aurora activity with world-class foreground scenery.
Finnish Lapland
Less crowded than Iceland and Norway, with consistent clear skies. Glass igloos and unique accommodations provide novelty. Season: September through March. Key advantage: lower tourism pressure means solitary shooting locations.
Alaska (Fairbanks)
The premier North American aurora destination. Fairbanks sits at 64 degrees N with easy access and relatively dry climate. Season: August through April. Key advantage: domestic travel for North American photographers, no passport required.
Post-Processing Aurora Images
The Saturation Trap
Aurora greens photograph more vividly than the naked eye perceives. This means your RAW files often contain more color saturation than what you actually saw. The temptation to add more saturation in post-processing leads to images that look artificial: radioactive greens, neon purples, and colors that no aurora has ever actually produced.
The professional approach: Start by reducing saturation slightly from the camera default. Use the HSL panel to target specific color channels. Pull green luminance down 5-10 points to add depth to the aurora curtains. Add subtle purple or magenta to the aurora edges if they were visible in person, but do not invent colors that were not there.
Noise Reduction
High-ISO aurora files require careful noise reduction that preserves star points and aurora structure:
- Luminance noise reduction: Apply judiciously. Too much turns stars into smudges and aurora curtains into smooth blobs.
- Color noise reduction: Can be applied more aggressively since color noise is never desirable.
- Topaz DeNoise or DxO PureRAW: These dedicated noise reduction tools consistently outperform Lightroom’s built-in sliders for high-ISO night photography.
Checking and Straightening Horizons
Shooting in darkness, often while craning your neck at the sky, leads to tilted horizons. Always check and correct this in post. A crooked horizon is the fastest way to make an otherwise strong aurora image look amateurish.
Exercises for Aurora Readiness
Exercise 1: Night Focus Drill
On any clear night, practice the bright star focus technique. Set up your tripod, find a bright star, and focus using Live View at maximum magnification. Take a test shot and zoom to 100% to verify star points are sharp. Repeat until you can nail focus in under two minutes. This skill must be automatic before you face a fast-moving aurora.
Exercise 2: ISO Noise Evaluation
Shoot identical compositions at ISO 1600, 2500, 3200, 4800, and 6400. Process each with your preferred noise reduction workflow. Determine the highest ISO where your camera and workflow produce acceptable results. This is your ceiling; knowing it prevents hesitation in the field.
Exercise 3: Cold Weather Gear Test
Spend two hours outdoors on the coldest night available, operating your camera with gloves. Identify which operations are impossible with thick gloves, which buttons you cannot find by feel, and how quickly your batteries drain. Solve these problems at home, not in Iceland at 2 AM with aurora overhead.
Conclusion
Photographing the northern lights combines technical precision with the unpredictability of solar physics and Arctic weather. You cannot control when the aurora appears, how bright it will be, or how long it will last. You can only control your preparation.
Arrive with your settings memorized, your focus technique practiced, your batteries warm, and your compositions pre-scouted. The aurora will perform on its own schedule. Your only job is to be ready when it does.