The Mountains That Break Your Plans and Reward Your Patience
Torres del Paine has a reputation problem. Not because it fails to deliver on its promise of dramatic mountain scenery, but because it delivers so inconsistently. Photographers arrive expecting the postcards: granite towers bathed in pink alpenglow, turquoise lakes reflecting perfect peaks, golden guanaco herds against a backdrop of snow and stone. What they often get instead is horizontal rain, 80 km/h wind, and cloud-wrapped mountains that refuse to reveal themselves for days.
The photographers who leave Patagonia with extraordinary images are not the ones who got lucky with weather. They are the ones who planned for bad weather, positioned themselves to exploit brief clearing windows, and spent enough days in the park that probability eventually worked in their favor.
This guide is built on that principle. It covers the essential photography locations, the logistics that position you for success, and the weather strategies that turn Patagonia’s legendary difficulty into a competitive advantage over photographers who show up hoping for the best.
Sign up to see photography location maps
The Five Essential Viewpoints
1. Mirador Base de Las Torres
GPS: 50.XX°S, 72.XX°W🔒 | Difficulty: Strenuous (8-10 hour round trip) | Best light: Sunrise
The iconic view of the three granite towers reflected in a glacial tarn. This is the image that defines Torres del Paine, and capturing it requires genuine commitment.
The hike is approximately 18 kilometers round trip with 800 meters of elevation gain. The final hour ascends a steep boulder field. To photograph sunrise, you must begin hiking in darkness at 3-4 AM, headlamp on, navigating the trail by memory or GPS.
Field strategy:
- Stay overnight at Refugio Chileno to cut 2 hours from your pre-dawn approach. Book months in advance.
- Alternatively, camp at Campamento Torres (free, basic) for direct access to the viewpoint.
- The sunrise alpenglow lasts approximately 8-12 minutes. The towers shift from cold blue to warm pink to blazing orange. Have your composition pre-planned and your exposure set before the color arrives.
- Cloud often wraps the towers during the day and clears briefly at dawn. This clearing window is your best opportunity.
- Wind at the tarn can reach 60+ km/h. Weight your tripod and position your body as a windbreak.
- A 24-35mm focal length captures all three towers with the tarn reflection. A 70-200mm isolates individual towers.
2. Lago Pehoe
GPS: 51.XX°S, 72.XX°W🔒 | Difficulty: Easy (roadside) | Best light: Sunrise
The classic Cuernos del Paine reflection shot. Turquoise glacial water, the distinctive horned peaks, and on calm mornings, a mirror reflection that halves the image into reality and dream.
Field strategy:
- Multiple viewpoints exist along the eastern shore. Scout during daylight, then return before dawn.
- Calm water is rare. Patagonian wind typically begins 1-2 hours after sunrise. Your reflection window is narrow: arrive at first light.
- Telephoto compression (100-200mm) creates a different composition than the wide-angle standard. Compress the Cuernos against the water for dramatic scale.
- The Hosteria Pehoe hotel sits on an island in the lake. If you can secure a booking, you have the shortest commute to the finest sunrise in Patagonia.
- Lenticular clouds over the peaks are common and add extraordinary drama. Do not dismiss cloudy mornings.
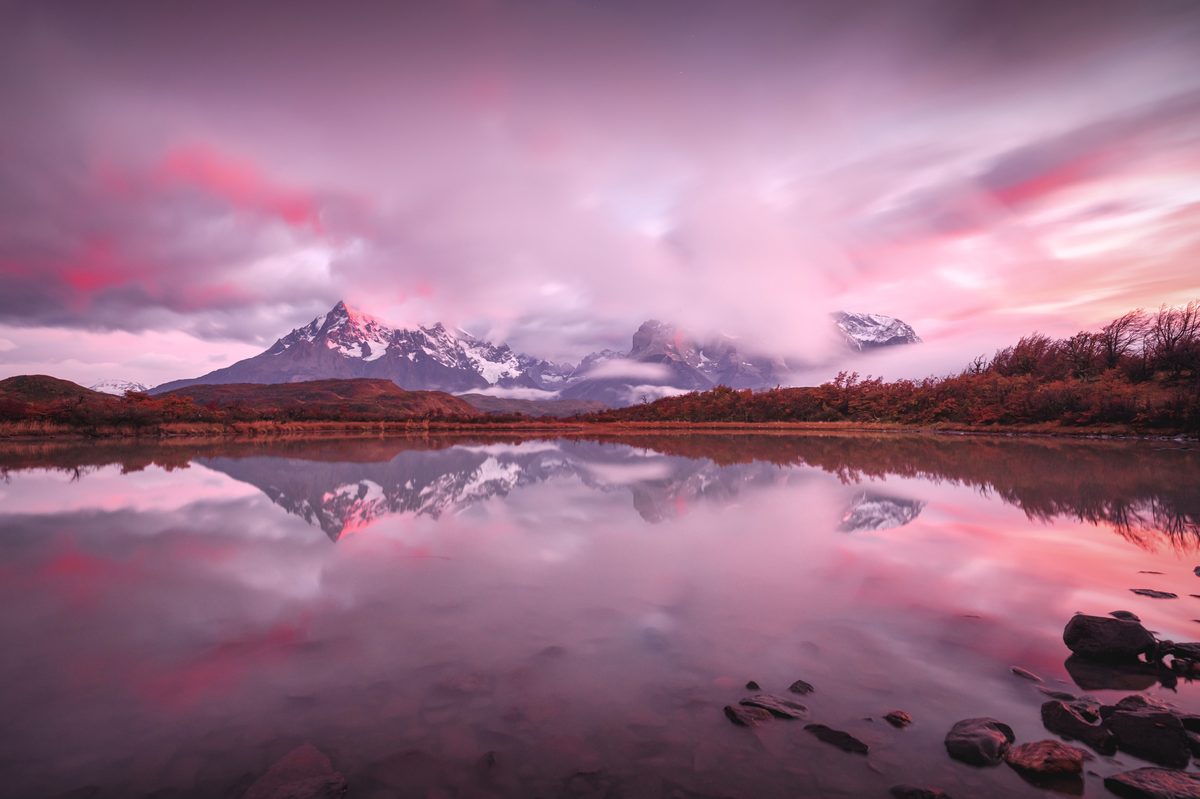
Photo: Mark Denney
3. Salto Grande
GPS: 51.XX°S, 73.XX°W🔒 | Difficulty: Easy (short walk) | Best light: Morning
A powerful waterfall where Lago Nordenskjold drains toward Lago Pehoe, framed by fire-scarred ghost forests and distant peaks.
Field strategy:
- The ghost forests from the 2011/2012 fire are a photographic subject in their own right. Bleached white trunks against dark water and stormy skies create high-contrast compositions.
- Long exposure (1-4 seconds) adds drama to the turbulent water without losing the waterfall’s power entirely.
- Rainbow potential in the spray, especially in morning light.
- The short walk from the parking area passes through varied terrain. Multiple compositions are available before you reach the main falls.
4. Grey Glacier
GPS: 51.XX°S, 73.XX°W🔒 | Difficulty: Moderate (boat access) | Best light: Overcast or blue hour
A massive glacier calving into Lago Grey, with floating icebergs ranging from car-sized to house-sized chunks of blue ice.
Field strategy:
- Boat tours provide unique perspectives impossible from shore. The Zodiac tours get you closest to the glacier face.
- Blue hour enhances the natural blue of glacial ice. If the boat schedule allows, late afternoon departures capture the best light.
- Include boats or kayakers for scale reference. The glacier face is enormous, but without a human element, viewers cannot gauge the size.
- Calving events are unpredictable but spectacular. Keep your shutter speed above 1/500s and your eye on the glacier face.
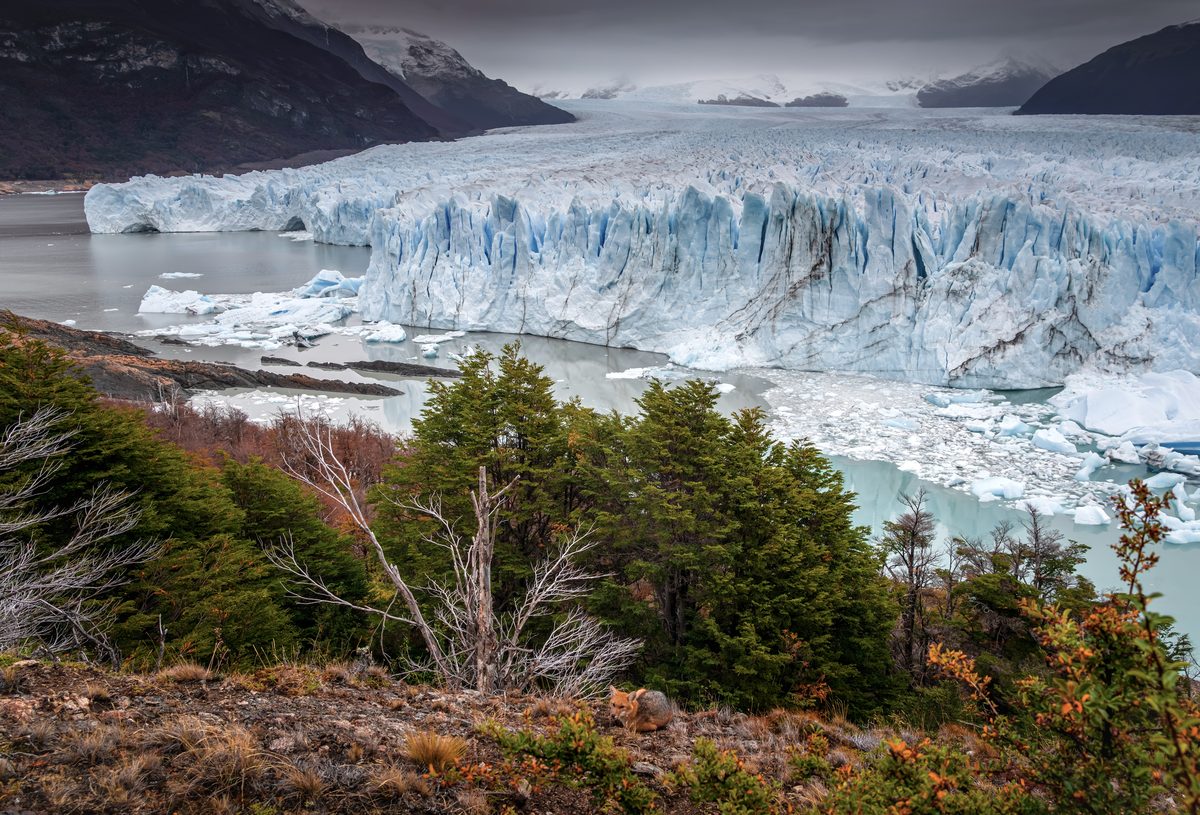
Photo: Mark Denney
5. Los Cuernos Lookout
GPS: Various points along W Trek | Difficulty: Moderate | Best light: Afternoon
The “horns” of Paine: distinctive peaks where dark metamorphic rock caps sit atop lighter granite spires. The geology tells a story of intrusion and erosion spanning millions of years.
Field strategy:
- Afternoon light reveals the contrast between the dark caps and light granite most dramatically.
- Lago Nordenskjold provides foreground depth from multiple viewpoints along the W Trek.
- Accessible from the Refugio Cuernos area for day-trippers.
- The junction between dark and light rock is a geological boundary worth composing around. Isolate it with a 100-200mm lens.
Understanding Patagonian Wind
Patagonia is one of the windiest inhabited places on Earth. Understanding the wind is as important as understanding your camera.
Sustained winds of 50-80 km/h are normal, not exceptional. Gusts exceeding 100 km/h occur regularly in spring and summer. This wind will:
- Topple unsecured tripods
- Cause visible camera shake even on heavy tripods
- Drive dust and sand into every exposed lens surface
- Exhaust you physically, reducing your ability to hike and shoot effectively

Photo: Mark Denney
Tripod Strategies
- Weight the center column: Hang your camera bag from the hook. Some photographers carry a dedicated stuff sack that they fill with rocks on-site.
- Go low: Spread legs wide and keep the tripod as low as possible. A tripod at 1.5 meters catches far more wind than one at 0.5 meters.
- Use shorter extensions: Every section of extended leg is a lever the wind can exploit.
- Position your body as a windbreak: Stand upwind of the camera.
- Consider ground-level compositions: Sometimes the wind demands you shoot from the ground. Embrace it.
Protecting Equipment
- Keep lens caps on when not actively shooting. Sand and grit infiltrate everything.
- Camera bags must remain closed. The fine Patagonian dust will coat internal compartments within hours.
- Avoid lens changes in wind. The two-body strategy (each body with a different lens mounted) eliminates this risk.
- Clean sensors before the trip. Cleaning facilities do not exist in the park.

Weather Windows and Seasonal Strategy
Patagonia’s weather patterns are driven by the Southern Patagonian Ice Field, the Andes, and the roaring forties westerlies. Cloud, wind, and precipitation can change within minutes.
Monthly Weather Probability
| Month |
Clear Sunrise Probability |
Wind Intensity |
Temperature Range |
Crowds |
| Oct |
25% |
Severe |
0-10C |
Low |
| Nov |
30% |
Strong |
2-14C |
Moderate |
| Dec |
35% |
Strong |
5-18C |
High |
| Jan |
35% |
Strong |
6-20C |
Peak |
| Feb |
40% |
Moderate-Strong |
5-18C |
High |
| Mar |
45% |
Moderate |
2-14C |
Moderate |
| Apr |
50% |
Moderate |
0-10C |
Low |

The April Advantage
April represents the optimal balance for photography:
- Autumn colors: Southern beech forests (lenga and nirre) turn gold, orange, and red. This color transforms foreground compositions.
- Calmer winds: While never truly calm, April’s winds are more manageable than the summer gales.
- Fewer crowds: Trails and viewpoints are less congested. You can work compositions without waiting for other photographers to clear.
- Snow on peaks: Fresh snowfall adds contrast and drama to the Torres and Cuernos.
- Sufficient daylight: Days are shorter than summer but still provide adequate shooting windows at dawn and dusk.
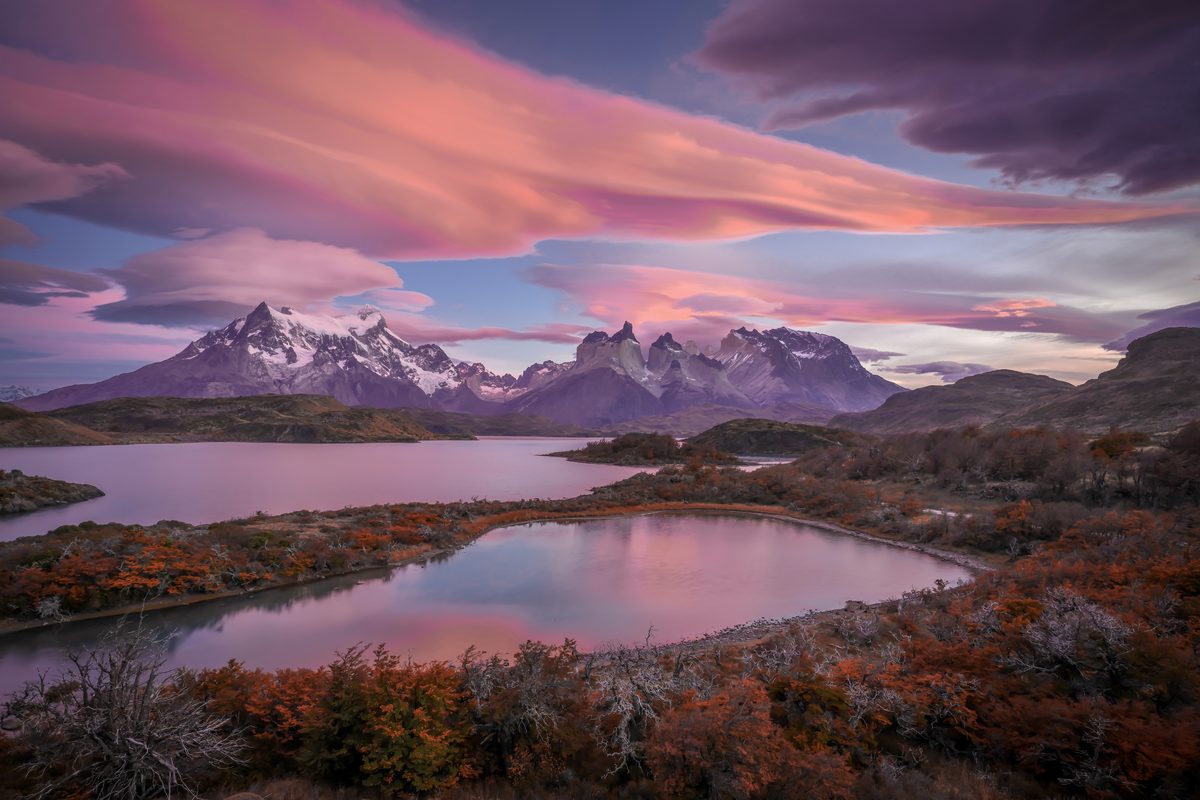
Photo: Mark Denney
Reading Weather for Photography Windows
Patagonia rewards the photographer who can read weather patterns, not just forecasts.
- Clearing from the west: When you see blue sky approaching from the west while cloud still covers the peaks, be ready. This is your window.
- Lenticular clouds: Lens-shaped clouds forming over peaks indicate high-altitude wind. They are photogenic but usually precede incoming weather.
- Dawn clearings: Mountains often clear briefly at dawn as overnight temperature inversions break. This window may last 20-60 minutes.
- Post-storm light: The hours immediately after a storm passes can produce the most dramatic light of the trip. Be positioned and ready.
Use Windy.com and the Chilean Meteorological Service for forecasts. Cross-reference both. Neither is consistently accurate beyond 48 hours in Patagonia.
Logistics: Getting There and Staying Close
Puerto Natales
The gateway town, located approximately 1.5 to 2 hours by road from the park entrance. All essential services: hotels, restaurants, equipment shops, fuel, and ATMs.
Arrival options:
- Fly to Punta Arenas (PUQ), bus or rental car to Puerto Natales (3 hours from Punta Arenas)
- Fly directly to Puerto Natales (limited flights from Santiago)
- Drive from El Calafate, Argentina (approximately 5 hours including border crossing)
Accommodation Strategy for Photography
Your accommodation choice directly determines your access to sunrise shooting. Position yourself accordingly.
| Base |
Best For |
Sunrise Access |
Price Range |
| Hotel Lago Grey |
Grey Glacier |
15-min drive to glacier |
$$$$ |
| Hosteria Pehoe |
Lago Pehoe reflections |
On-site (walk out the door) |
$$$$ |
| EcoCamp Patagonia |
Central park access |
30-45 min to most viewpoints |
$$$$ |
| Refugio Chileno |
Base Torres sunrise |
3-hour hike to tarn |
$$ |
| Puerto Natales |
Budget/flexibility |
1.5-2 hour drive to park entrance |
$-$$ |
Refugios (mountain huts) and campsites must be booked months in advance through authorized operators and the park’s booking system (CONAF manages the park, but reservations are handled through various authorized concessionaires). Peak season availability disappears 4-6 months before travel dates.
Day Trips vs. the W Trek
The W Trek is Patagonia’s iconic multi-day hike, traversing the core of Torres del Paine over 4-5 days. For photographers, the choice between day trips and the trek involves genuine trade-offs.
Day Trips
Advantages: Fresh gear and charged batteries each day. Ability to drive to whichever location has the best conditions. Clean, warm base at night. No weight restrictions on camera equipment.
Disadvantages: Cannot reach Base Torres for sunrise without a brutal 3 AM start from the trailhead. Miss the immersion of multi-day backcountry access.
W Trek
Advantages: Base Torres sunrise accessible from Refugio Chileno. Multi-day immersion in the landscape. Early and late access without crowds. The classic trekking experience.
Disadvantages: Must carry all camera gear for 4-5 days. Limited battery charging at refugios (unreliable). Cannot reposition to exploit weather patterns elsewhere in the park.
The Photographer’s Compromise
Spend 5-7 days minimum in the region. Use 2-3 days for day trips to Lago Pehoe, Salto Grande, and other roadside locations. Then commit to a 2-3 day out-and-back focused on Base Torres, overnighting at Refugio Chileno or Campamento Torres.
This hybrid approach gives you the best of both worlds: mobility for weather-chasing on day trips, and backcountry access for the must-have sunrise at Base Torres.
Drone Regulations
Drones are prohibited within Torres del Paine National Park. This is actively enforced, and fines are substantial.
Drone alternatives:
- Areas outside park boundaries (always verify current regulations)
- Argentine Patagonia, particularly Los Glaciares National Park (check current Argentine regulations)
- The Lago Sarmiento area east of the park
If you require commercial aerial photography, contact CONAF (Chile’s forestry and parks authority) well in advance for permit information.
Sample 6-Day Photography Itinerary
Day 1: Arrival and Lago Pehoe Sunset
- Arrive Puerto Natales, pick up rental vehicle, stock supplies
- Afternoon drive to park (1.5-2 hours)
- Scout Lago Pehoe viewpoints
- Sunset shoot at Lago Pehoe
Day 2: Sunrise at Lago Pehoe, Salto Grande
- Pre-dawn positioning at Lago Pehoe for reflection attempt
- Morning at Salto Grande and ghost forests
- Afternoon rest and image review
- Sunset at alternate Lago Pehoe viewpoint
Day 3: Grey Glacier
- Morning boat to Grey Glacier
- Full day with icebergs and glacier face
- Return for sunset if conditions warrant
Day 4: Base Torres Trek (Day 1)
- Drive to Las Torres trailhead
- Hike to Refugio Chileno (4-5 hours with camera gear)
- Settle in, rest, prepare for early start
Day 5: Base Torres Sunrise, Return
- Depart 3:30 AM for tarn
- Sunrise shoot at Base Torres
- Return to Refugio Chileno, pack out to trailhead
- Drive back to base, rest
Day 6: Flexible Reshoot Day
- Return to whichever location had the best conditions
- Target any sunrise or sunset opportunities missed due to weather
- Afternoon departure to Puerto Natales
When Weather Defeats You
It will happen. Possibly for multiple days. When the mountains are invisible behind cloud and wind, these alternatives produce strong work:
- Guanacos: Wild relatives of the llama, abundant near the park entrance. A 200-400mm lens captures portraits against moody skies.
- Ghost forests: The fire-scarred trees along the eastern shore of Lago Nordenskjold are dramatic in any conditions. Overcast light reduces contrast and suits black-and-white conversion.
- Lago Sarmiento thrombolites: Unusual rock formations on the lake’s eastern shore, outside the park. Accessible in any weather.
- Cueva del Milodon: A massive prehistoric cave 25 km from Puerto Natales. Historical interest and sheltered from wind.
- Estancia landscapes: The working ranches outside the park offer classic Patagonian grassland compositions with gaucho culture.
As David duChemin writes in Within the Frame, the constraint of bad weather can force you to see a familiar landscape differently. Some of the strongest Patagonia portfolios include as many storm images as clear-sky peaks.
The Honest Assessment
Torres del Paine is not a comfortable photography destination. The weather is hostile, the logistics are demanding, the costs are significant, and success is never guaranteed. Photographers who visit once and get skunked by weather sometimes never return.
But the photographers who persist, who budget for enough days, who position themselves for the brief clearing windows, and who find beauty in the drama of Patagonian storms: they produce portfolios that define what mountain landscape photography can be.
Plan thoroughly. Pack for the worst. Arrive early and stay late. Patagonia rewards persistence above all else.