The Light That Does Not Behave Like Light Anywhere Else
The first time you experience arctic light, it rewrites everything you thought you knew about golden hour. In the Lofoten Islands during January, the sun barely clears the horizon. What results is not a brief golden hour that bookends the day. The entire day is golden hour. For three or four hours, the light rakes across jagged peaks and still fjords at an angle so low that shadows stretch for hundreds of meters and every surface glows with warm, directional light.
Then the sun sets, and the blue hour begins. Not the twenty-minute blue hour you get at temperate latitudes. In Lofoten in winter, blue hour lasts for hours, merging seamlessly with the twilight that precedes and follows the brief midday sun. On clear nights, the aurora arrives to replace the fading blue with curtains of green and violet light dancing across the sky above snow-covered peaks.
Norway is not just another destination on the landscape photographer’s list. It is a masterclass in light, weather, and endurance. The rewards are extraordinary. The demands are real. This guide covers the locations, the timing, the seasonal strategies, and the logistics that separate photographers who return with a few lucky snapshots from those who return with portfolio-defining work.
Six Regions, Six Experiences
Norway stretches over 1,700 kilometers from its southern tip to the North Cape. Photographically, the country divides into distinct regions, each with its own character, optimal season, and signature subjects.
Sign up to see photography location maps
Lofoten Islands: The Crown Jewel
Lofoten is the reason most photographers come to Norway. An archipelago of dramatic granite peaks rising directly from the Norwegian Sea at 68 degrees north latitude, connected by bridges and tunnels along the E10 highway. The combination of jagged mountains, sheltered fjords, traditional red rorbuer fishing cabins, and extreme arctic light creates a photographic density unmatched in Northern Europe.
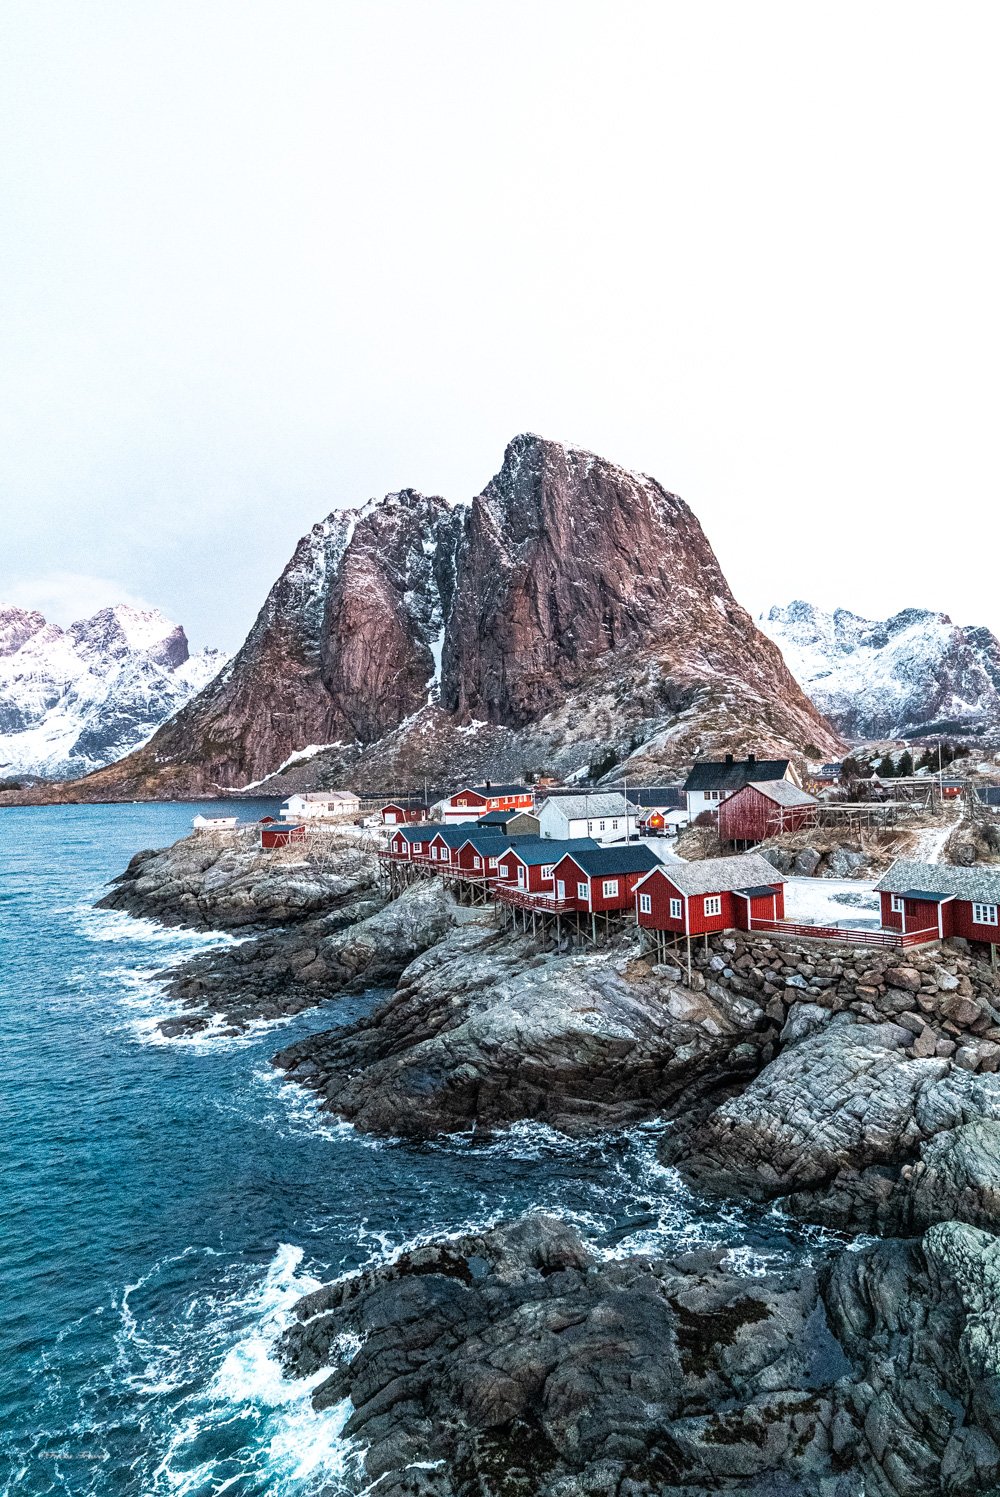
Photo: John O'Nolan
Essential Lofoten Locations
Reine and Reine Fjord
GPS: 67.XX°N, 13.XX°E🔒 | Best light: All day in winter; sunrise/sunset in summer
The most photographed village in Lofoten, and for good reason. Red rorbuer cabins cluster on a small peninsula surrounded by water, backed by the dramatic peaks of Reinebringen and Olstinden. The compositions are almost too generous: reflections, leading lines, foreground interest, and towering backgrounds all present themselves within a few hundred meters.
Field strategy:
- The classic Reine viewpoint is from the bridge on the E10 approaching from the east. Arrive early for calm water reflections.
- Reinebringen (the peak directly above Reine) provides the iconic aerial perspective. The hike is steep (1.5 hours) and can be treacherous in winter conditions. Chains and railings have been installed on the improved trail, but ice makes the final section dangerous from November through April. Assess conditions honestly.
- The old road along the north side of Reine Fjord offers compositions of the cabins with mountain reflections that most photographers miss because they stop at the bridge.
Hamnoy
GPS: 67.XX°N, 13.XX°E🔒 | Best light: Sunrise in winter (south-facing)
The iconic red rorbu on stilts over the water, framed by the mountain Festhelltinden. This is one of the most-reproduced images from Lofoten, and capturing your own version that transcends the cliche requires weather and timing.
Field strategy:
- The classic composition is from the bridge between Hamnoy and Sakrisoy, shooting southeast.
- Storm conditions produce the most dramatic images. Waves crashing against the rorbu stilts, spray in the air, dark clouds breaking over the peaks.
- Long exposure (2-8 seconds) with an ND filter smooths the water while preserving the drama of clouds in motion.
- Aurora compositions from this location work well because the mountains to the south are low enough to allow southern aurora displays to appear above the village.
Kvalvika Beach
GPS: 68.XX°N, 13.XX°E🔒 | Best light: Sunset (west-facing beach)
A remote beach accessed by a 45-minute hike over a mountain pass from Fredvang. The beach faces northwest, making it one of the few Lofoten locations where the sun sets directly into the ocean during summer.
Field strategy:
- The hike is moderate but involves a steep descent to the beach. In winter, microspikes or crampons are essential.
- Ryten peak (543m) above Kvalvika provides a bird’s-eye view of the beach and the sea. The hike to the summit adds approximately 90 minutes.
- Midnight sun compositions from Ryten in June and July are world-class. The sun skims the horizon to the northwest, casting warm light across the beach and the surrounding peaks.
Uttakleiv and Haukland Beaches
GPS: 68.XX°N, 13.XX°E🔒 (Uttakleiv) | Best light: Year-round
Two adjacent beaches on the outer coast with distinctive rock formations and mountain backdrops. The dragon’s eye rock at Uttakleiv is a natural stone arch that frames compositions dramatically.
Field strategy:
- Uttakleiv faces northwest, receiving midnight sun in summer and dramatic storm light in winter.
- The distinctive foreground rocks provide natural leading lines toward the mountains.
- Northern lights from Uttakleiv are excellent because the beach faces north with an unobstructed horizon.
- Haukland, immediately adjacent, offers a longer sweep of sand with different mountain geometry. Scout both in daylight and commit to one for the main event.
Svolvaer and the Eastern Islands
GPS: 68.XX°N, 14.XX°E🔒 | Best light: Sunrise (east-facing harbor)
The largest town in Lofoten, Svolvaer serves as the eastern gateway and offers urban-meets-arctic compositions: the harbor with fishing boats, the Svolvaer Goat rock formation, and views across the Vestfjord.
Svolvaer is also the access point for sea eagle safaris and boat trips to Trollfjord, a narrow fjord surrounded by 1,000-meter walls that is one of Norway’s most dramatic natural features. The boat trip is worth the cost for a serious photographer.
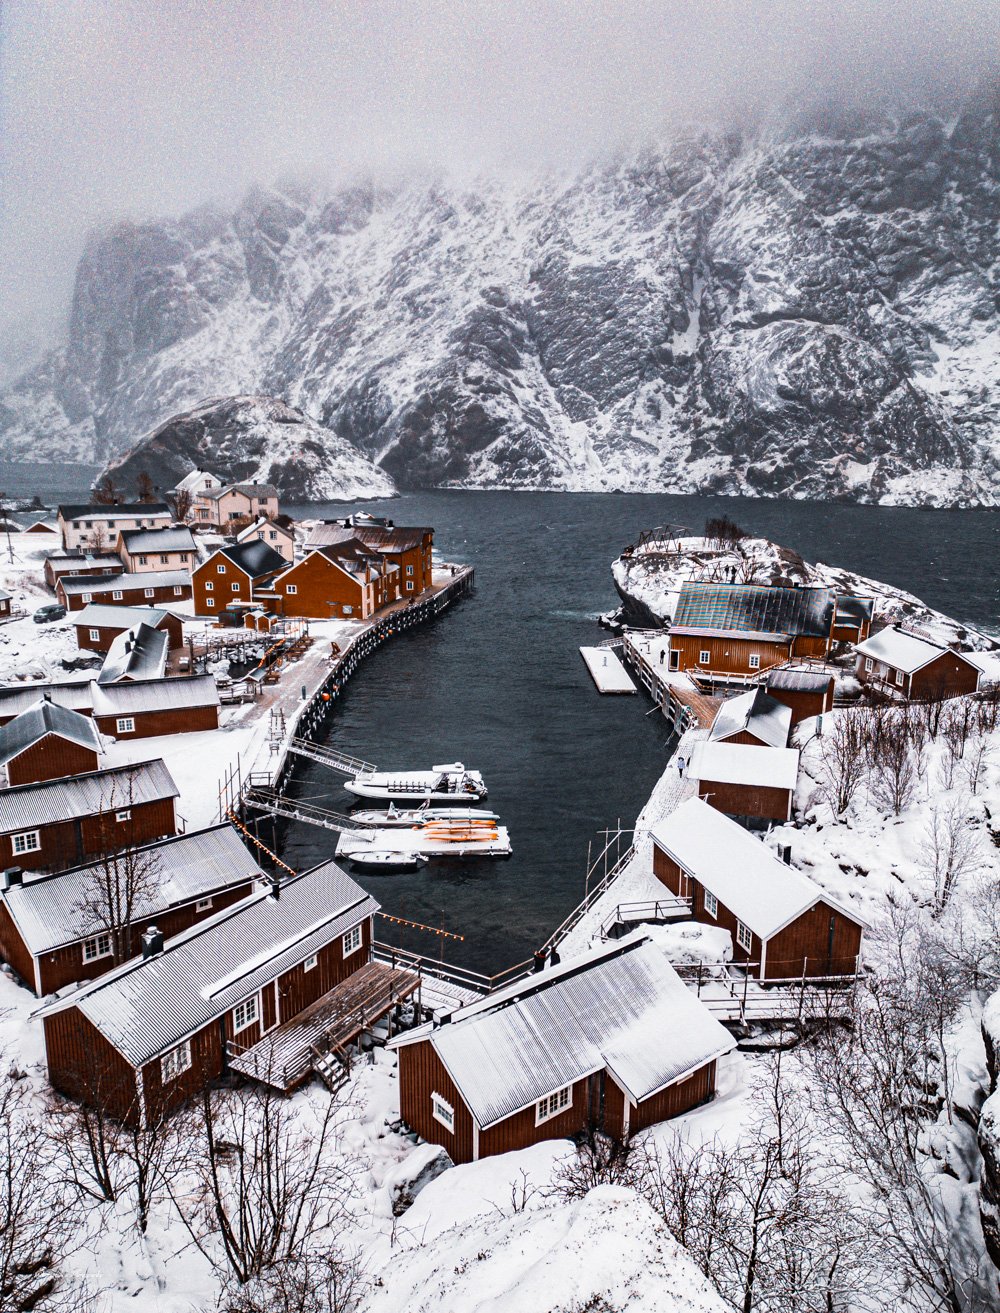
Photo: Amin Ghadersohi
Seasonal Strategy: When to Visit
The choice of season fundamentally changes what kind of photography Norway offers. There is no single “best time.” There is the best time for what you want to shoot.

Winter (January-March): The Photographer’s Choice
Winter is the optimal season for serious landscape photographers. The light is extraordinary. The crowds are minimal. The aurora is active. The visual drama is at its peak.
What you gain:
- All-day golden and blue hour light. The sun is so low that even midday light has the warmth and directionality of golden hour at lower latitudes.
- Northern lights from late afternoon onward (dark by 3-4 PM in January).
- Snow-covered peaks creating high contrast against dark water and sky.
- Minimal tourist presence. You will have most locations to yourself.
- The possibility of combining auroras with snow-covered landscapes in a single composition.
What you sacrifice:
- Very short shooting days. January offers only 1-2 hours of direct sun; March offers approximately 10 hours.
- Severe cold. Temperatures range from -5C to 3C, with wind chill pushing effective temperatures much lower. Your batteries will drain rapidly.
- Road conditions can be challenging. The E10 is maintained, but side roads and mountain passes may be closed.
- Hiking is limited. Many mountain trails are impassable due to snow and ice.
Recommended duration: 7-10 days to weather-proof your itinerary.
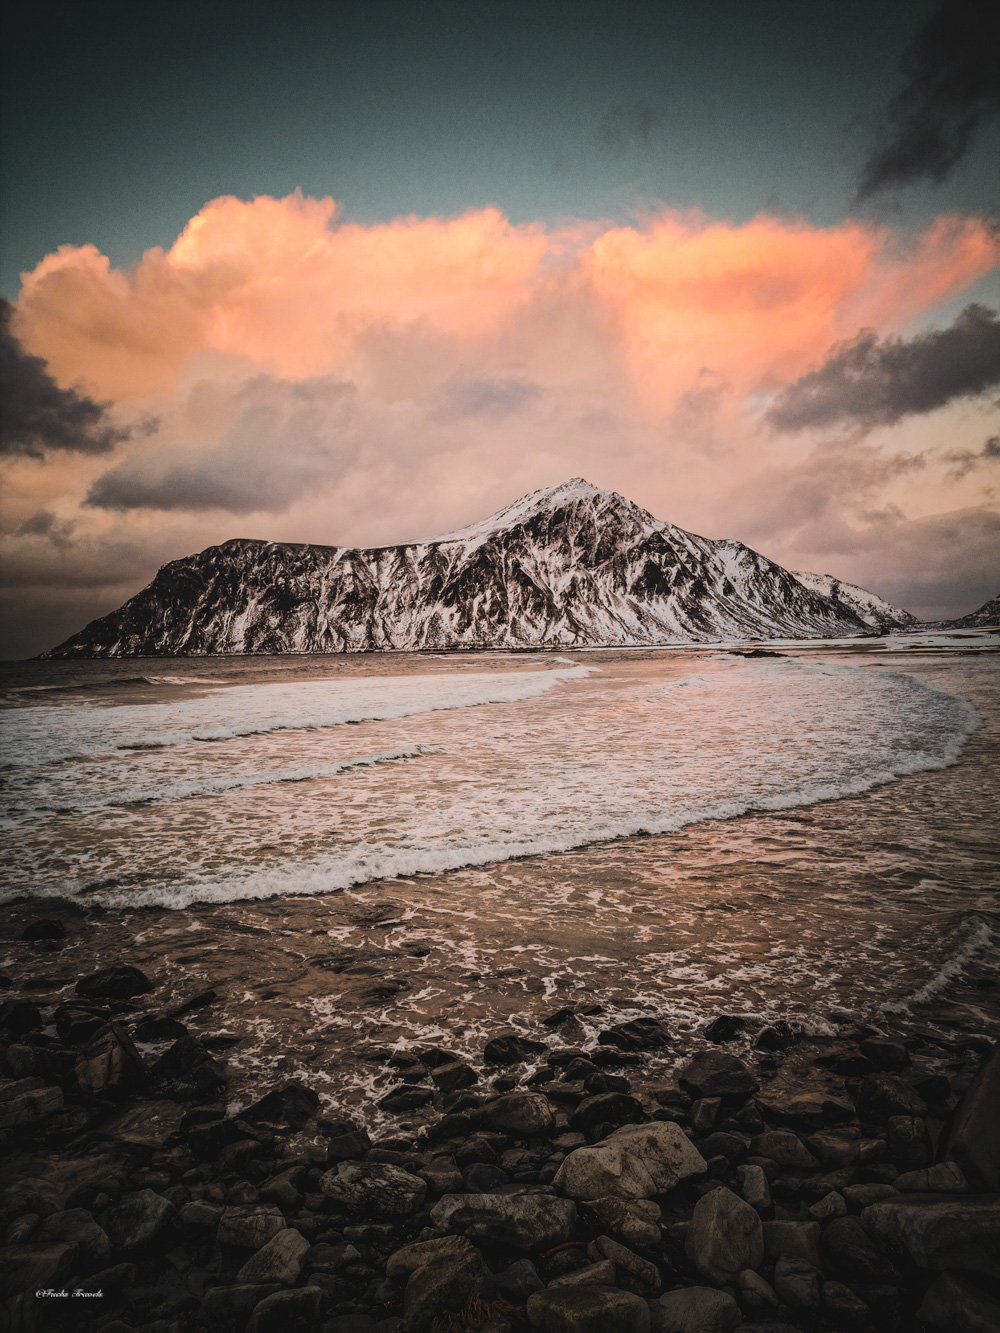
Photo: Amin Ghadersohi
Spring (April-May): The Transition
Spring offers rapidly increasing daylight, residual snow on peaks, and the last chance for aurora activity (fading by late April). Waterfalls surge with snowmelt. The sea eagle breeding season brings active bird photography.
The driest weather of the year occurs in May, making it the most reliable month for clear skies.
Summer (June-August): Midnight Sun
From late May to mid-July, the sun does not set in Lofoten. This creates unique photographic opportunities but eliminates aurora possibilities and the dramatic light of winter.
What you gain:
- Unlimited shooting time. The midnight sun provides warm light on the western beaches throughout the night.
- Access to all mountain trails and remote locations.
- Wildflowers on hillsides and in villages.
- Whale watching and sea kayaking opportunities.
What you sacrifice:
- No aurora. The sky never gets dark enough.
- Flat midday light for many hours. The sun circles high enough to produce harsh overhead light from 10 AM to early evening.
- Peak tourist season. Popular viewpoints and trails will be crowded.
- The signature dramatic light of winter is absent.
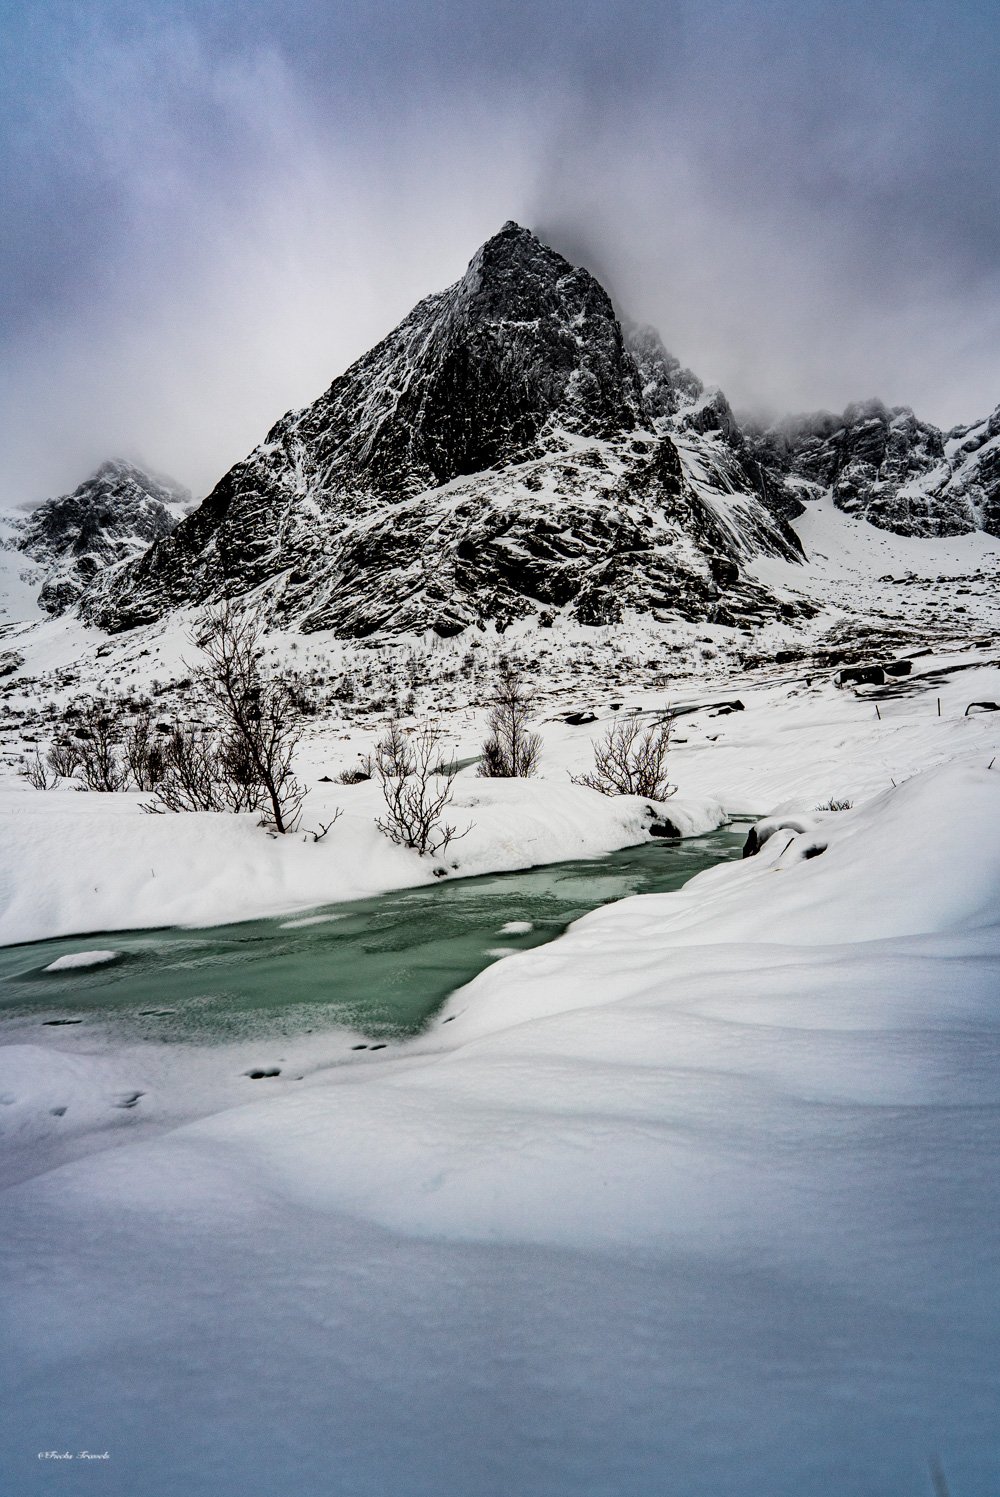
Photo: Amin Ghadersohi
Autumn (September-November): Aurora Returns
Aurora activity resumes in September, autumn colors briefly appear on the sparse birch vegetation, and the retreating light creates increasingly dramatic conditions. October and November bring storm season with powerful weather that produces the most dramatic skies of the year.
The tradeoff: autumn is the wettest season. Rain days exceed 50% of the month in October and November. You will spend significant time waiting for clearings.

Senja: The Uncrowded Alternative
Senja is Norway’s second-largest island, located north of Lofoten, accessible via the E6 and Route 86. It offers similarly dramatic mountain-meets-sea landscapes with a fraction of Lofoten’s photographic traffic.
Key Senja Locations
Segla Peak
GPS: 69.XX°N, 17.XX°E🔒 | Best light: Sunrise, aurora
A distinctive triangular peak that has become Senja’s signature. The hike to the viewpoint (approximately 2.5 hours) rewards with views of Segla reflected in mountain tarns below, with the open sea beyond.
Tungeneset (Devil’s Teeth)
GPS: 69.XX°N, 17.XX°E🔒 | Best light: Sunset, aurora
A rocky peninsula with sharp, tooth-like rock formations projecting into the sea. The foreground interest is exceptional, and the north-facing aspect makes it ideal for aurora photography.
Husoy Fishing Village
GPS: 69.XX°N, 17.XX°E🔒 | Best light: All day
A tiny fishing village on a small island connected by a single-lane road through a mountain tunnel. The village and its harbor provide intimate, human-scale compositions against a backdrop of massive peaks.
Senja vs. Lofoten
| Factor |
Lofoten |
Senja |
| Dramatic peaks |
Exceptional |
Excellent |
| Iconic locations |
Globally recognized |
Emerging recognition |
| Crowds (winter) |
Low-moderate |
Very low |
| Crowds (summer) |
High |
Moderate |
| Accommodation options |
Good (rorbuer) |
Limited |
| Accessibility |
Direct flights to Svolvaer/Leknes |
Drive from Tromso (3 hours) |
| Aurora viewing |
Excellent |
Excellent |
| Overall photo density |
Higher |
Lower but concentrated |
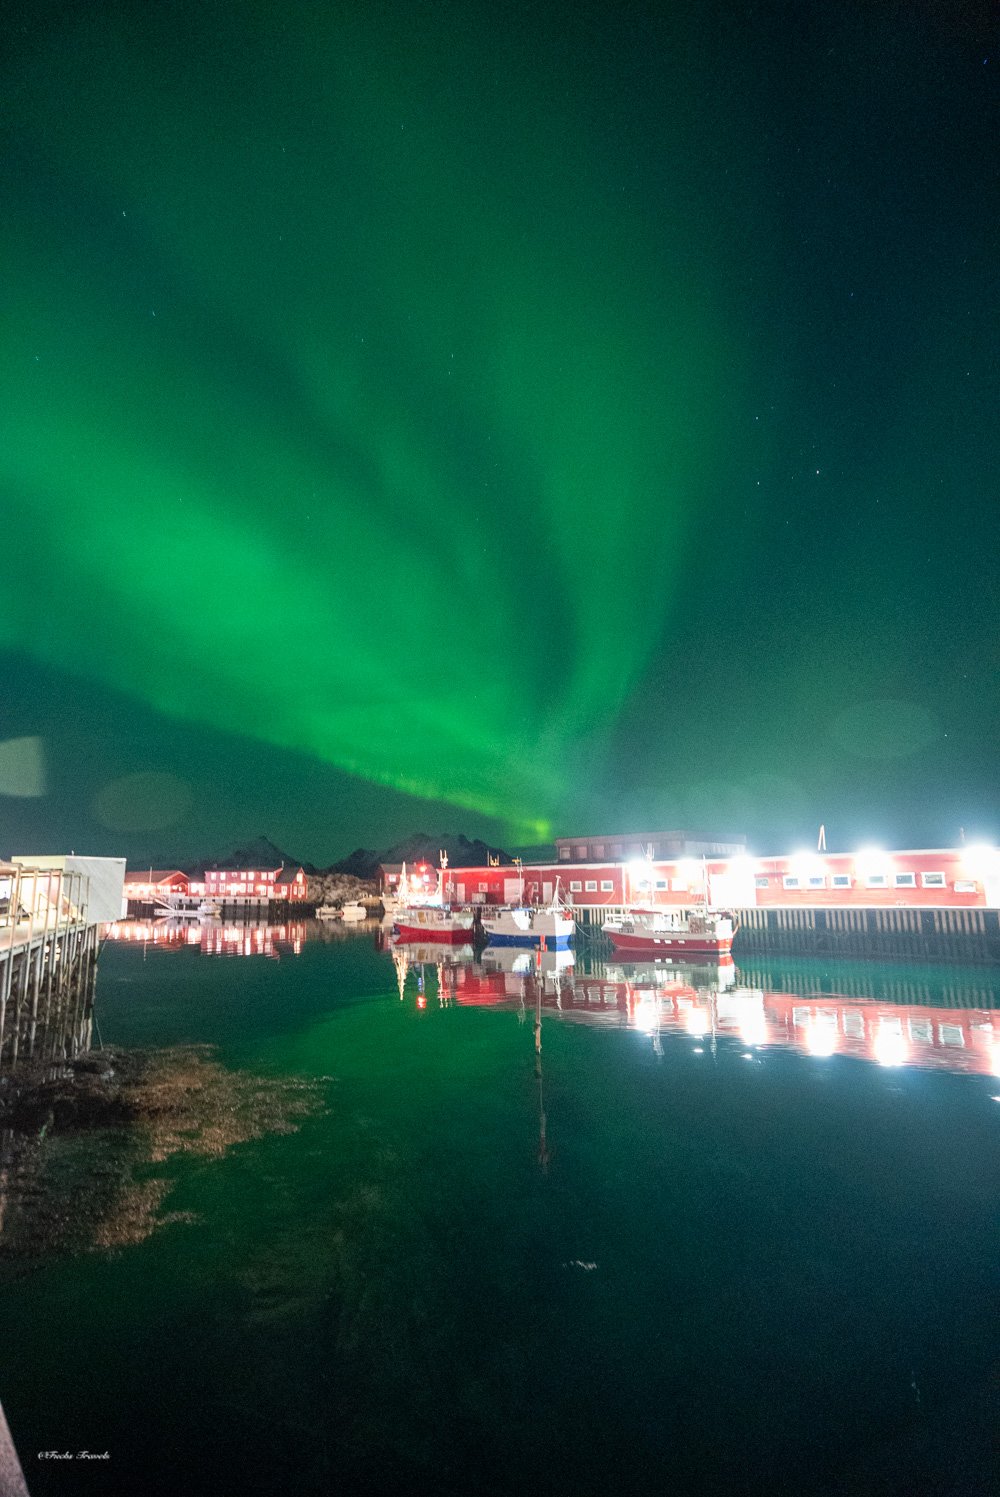
Photo: Amin Ghadersohi
Tromso: The Aurora Capital
Tromso (69.6N) is the largest city in Northern Norway and the primary base for dedicated aurora photography. Its position directly beneath the auroral oval means that even moderate geomagnetic activity produces visible displays.
Aurora Strategy from Tromso
- Aurora forecast: Monitor the Canadian Space Weather Forecast Centre (spaceweather.gc.ca, operated by Natural Resources Canada) and the Yr.no aurora forecast. Kp 3 or above typically produces visible aurora from Tromso.
- Light pollution escape: Drive 20-30 minutes outside the city in any direction. The bridge west to Kvaloya island, or the road onward to Sommaroy, provide dark skies with foreground interest.
- Tour vs. independent: Tromso offers numerous aurora tours with experienced guides who chase clear skies. For photographers who want creative control over their compositions and exposure time, a rental car and independent pursuit is preferable.
- Whale watching: From November through January, orca and humpback whales follow herring into the fjords near Tromso. Combining aurora and whale photography in a single trip is uniquely possible here.
The Western Fjords: Geirangerfjord and Beyond
Southern Norway’s fjord coast offers a different photographic experience: towering vertical walls, thundering waterfalls, and UNESCO World Heritage scenery that defines the Norwegian fjord landscape.
Geirangerfjord
GPS: 62.XX°N, 7.XX°E🔒 | Season: May-September (road access dependent)
Perhaps the most famous fjord in the world, Geirangerfjord stretches 15 kilometers between near-vertical walls rising up to 1,700 meters from the water. The Seven Sisters waterfall cascades in seven distinct streams from the southern wall.
Flydalsjuvet Viewpoint: The classic overlook, accessible by car, provides the iconic bird’s-eye perspective of the fjord with cruise ships below.
Trollstigen: The famous serpentine mountain road with 11 hairpin turns, located nearby. The new viewing platform cantilevers over a 200-meter drop. Spectacular but crowded in summer.
Preikestolen (Pulpit Rock)
GPS: 58.XX°N, 6.XX°E🔒 | Best light: Sunrise
A flat-topped cliff projecting 604 meters above Lysefjord near Stavanger. The 4-hour round-trip hike is moderate and heavily trafficked in summer. For photography, sunrise requires an overnight bivouac or a very early start (2 AM in summer). The reward: Preikestolen with no tourists and warm light on the cliff face.
Drone Photography in Norway
Norway is relatively drone-friendly compared to many European countries, but regulations exist and enforcement is increasing.
Current Regulations (as of 2026)
- Registration: Required for all drones through the Norwegian Civil Aviation Authority (Luftfartstilsynet).
- EASA rules apply: Norway follows EU drone regulations as an EASA member state.
- National parks: Drone use is prohibited in all Norwegian national parks without a special permit.
- Height limit: 120 meters AGL maximum.
- Distance from people: Minimum 30 meters horizontal from uninvolved persons for Open Category.
- Lofoten specifics: Many popular viewpoints are within protected areas. Verify each location individually using the Luftfartstilsynet’s map tool.
- Senja: Less restricted than Lofoten in general, but check nature reserves.
Practical Tips
- Cold weather dramatically reduces battery performance. Keep batteries warm in inner jacket pockets until launch.
- Wind at Lofoten coastal locations frequently exceeds safe operating limits. The Mavic 4 Pro handles Level 6 winds (24-30 mph), but coastal gusts can spike well above sustained readings.
- The low sun angle in winter creates extraordinary long shadows visible only from altitude.
- Fly early morning for calm air. Wind typically builds after 10 AM.
Gear for Arctic Norway
Cold Weather Essentials
Norway in winter is not casually cold. It is functionally cold, the kind of cold that degrades equipment performance and impairs your ability to operate a camera within 30 minutes if you are not properly prepared.
Camera batteries: Carry 4-6 batteries minimum. Cold reduces lithium-ion capacity by 30-50%. Rotate batteries from warm pockets to the camera and back. The Sony A1 II uses the NP-FZ100; the Nikon Z8 uses EN-EL15c. Both lose significant capacity below -10C.
Hand protection: You cannot operate a camera in heavy ski gloves. Use a layered system: thin merino wool liner gloves for camera operation, heavy insulated outer mittens for all other times. Flip the mittens back when shooting, replace them immediately between shots.
Tripod: Carbon fiber tripods are essential in Norway. Aluminum at -10C conducts heat out of your hands instantly. If you touch bare aluminum at arctic temperatures, your skin can freeze to the metal.
Lens fogging: Moving from a cold car to a warm rorbu (or vice versa) fogs lenses and viewfinders immediately. Seal your camera in a plastic bag before entering a warm space. Let it acclimate inside the sealed bag for 20-30 minutes before opening.
Recommended Lens Kit
| Lens |
Primary Use in Norway |
| 14-24mm f/2.8 |
Aurora, wide fjord vistas, rorbuer compositions |
| 24-70mm f/2.8 |
Workhorse: villages, details, landscapes |
| 70-200mm f/2.8 |
Compressed mountain layers, wildlife, details |
| 100-400mm (optional) |
Sea eagles, whales, distant peak isolation |
A 14mm or wider lens is essential for aurora photography. The wide field captures more of the aurora display, and the f/2.8 aperture gathers enough light for 10-15 second exposures at ISO 3200-6400.
Logistics and Planning
Getting There
Lofoten: Fly Oslo to Bodo (SAS, Norwegian, Wideroe), then short flight to Leknes or Svolvaer. Or take the Bodo-Moskenes ferry (4 hours, scenic but infrequent in winter).
Tromso: Direct flights from Oslo (2 hours).
Bergen/Western Fjords: Direct international flights. Hub for fjord access.
Rental Cars
A rental car is mandatory in Norway. Public transport is limited, infrequent in winter, and incompatible with a photographer’s schedule of pre-dawn departures and late-night aurora chases.
- Lofoten: 4WD recommended in winter for side roads. The E10 is paved and maintained.
- Studded tires: Available on winter rentals and essential on icy roads.
- Fuel: Gas stations are spaced every 30-50 km in Lofoten. Fill up when you can; do not let the tank drop below half.
Accommodation
Rorbuer (traditional fishing cabins): The signature Lofoten accommodation. Ranges from basic shared cabins to luxury renovated units with heated floors and kitchens. Book 3-6 months in advance for winter and summer peak seasons.
- Reine Rorbuer: The classic, steps from the most photographed viewpoint in Lofoten.
- Eliassen Rorbuer (Hamnoy): Location directly in front of the iconic Hamnoy rorbu composition.
- Hattvika Lodge (Ballstad): Premium renovated rorbuer with restaurant.
Budget: Norway is expensive. Expect NOK 1,500-3,000 ($140-280) per night for a decent rorbu. Self-catering in a rorbu kitchen significantly reduces food costs versus restaurant dining.
Sample 10-Day Winter Itinerary
| Day |
Base |
Focus |
| 1 |
Arrive Leknes/Svolvaer |
Settle, scout nearby locations |
| 2 |
Svolvaer area |
Svolvaer harbor sunrise, Trollfjord boat trip |
| 3 |
Henningsvaer |
Fishing village, Gimsoystraumen bridge |
| 4 |
Uttakleiv/Haukland |
Beach compositions, aurora hunting |
| 5 |
Reine/Hamnoy |
Classic rorbuer compositions, blue hour |
| 6 |
Reine/Hamnoy |
Weather reshoot day, Kvalvika if conditions allow |
| 7 |
Reine |
Reinebringen (conditions permitting), fjord compositions |
| 8 |
Nusfjord/Flakstad |
Historic fishing village, Flakstad Beach |
| 9 |
Flexible |
Reshoot best conditions, unexplored locations |
| 10 |
Departure |
Final morning shoot, transfer to airport |
Build at least two flexible reshoot days into any Norway itinerary. Weather will defeat you on multiple days. The photographers who return with the best images are the ones who can revisit locations when conditions finally align.
Essential Apps
- PhotoPills: Sun/moon position, blue/golden hour timing, aurora prediction
- Yr.no: Norway’s national weather service. More accurate for Norwegian conditions than international services
- Windy.com: Wind speed and direction forecasting. Critical for drone and tripod decisions
- Norway Lights (app): Aurora forecast specific to Norwegian locations
- Google Maps offline: Download the entire Lofoten map before arriving. Cell coverage is inconsistent
Filters for Fjord Photography
| Filter |
Primary Use |
| Circular Polarizer |
Cutting glare on water, enhancing sky |
| ND64 (6-stop) |
Long exposure water smoothing |
| ND1000 (10-stop) |
Extended long exposure, cloud streaks |
| GND 0.9 (3-stop soft) |
Balancing bright sky with dark fjord water |
The circular polarizer is more useful in Norway than in most destinations. Fjord water is highly reflective, and polarizing it reveals the turquoise and teal colors beneath the surface glare.
Exercises: Preparing for Norway
Exercise 1: The Low-Light Readiness Test
Set your camera to ISO 3200, f/2.8, 15-second exposure. Photograph a dark scene with some point light sources. Process the RAW file with aggressive shadow lifting (+3 EV shadows). Evaluate the noise character. This is what your aurora files will look like. If the noise is unacceptable, consider renting a faster lens or upgrading your body before the trip.
Exercise 2: The Long Exposure Series
Practice ND filter technique at a local body of water. Shoot the same composition at 1/4 sec, 1 sec, 4 sec, 15 sec, and 60 sec. Study how water texture changes at each exposure time. In Norway, you will need to make this decision quickly as conditions change.
Exercise 3: The Cold Weather Drill
Go outside on the coldest day available and spend 90 minutes shooting. Practice battery swaps with gloved hands. Practice changing settings without removing gloves. Note when your fingers lose dexterity and develop your warm-up rotation. If 90 minutes in -5C is challenging, Norway in January at -15C with wind will be brutal.
Exercise 4: The Weather Chase
For one week, check Yr.no and Windy.com forecasts each evening. Identify the optimal photography window for the next day based on the forecast. Go shoot during that window. Compare the actual conditions to the forecast. This exercise builds the weather-reading skills that determine success in Norway.
Conclusion
Norway rewards photographers who come prepared for its extremes: the extreme beauty of its light, the extreme demands of its weather, and the extreme logistical challenges of operating in an arctic environment. The images that define Lofoten, the red rorbuer against blue twilight mountains, the aurora sweeping over snow-covered peaks, the midnight sun gilding remote beaches, are not lucky accidents. They are the product of careful planning, physical endurance, and the willingness to stand in the cold long after comfort has departed.
Bring enough days. Bring enough batteries. Bring enough determination to outlast the weather. Norway will give you images you cannot make anywhere else on Earth.
As Galen Rowell’s career in extreme-environment photography demonstrates, the camera is the easy part. The hard part is being in the right place, in the right conditions, with the physical and mental readiness to execute when the moment arrives. Norway tests all of that. The reward is light that does not exist at any other latitude.