The Country That Rewards the Photographer Who Stays Longer
Most photographers spend seven days in New Zealand and photograph the greatest hits: Milford Sound, Mount Cook, the Wanaka tree, perhaps Queenstown’s Remarkables range. They capture beautiful images. They miss the country entirely.
New Zealand is not a checklist destination. It is a place where the best photographs come from the third morning at Milford Sound, after two days of rain, when a cold front clears and a thousand temporary waterfalls cascade down walls that were bare rock twenty-four hours earlier. It is a place where the Milky Way above Lake Tekapo rewards the photographer who drove four hours from Queenstown, slept in the car, and stood in near-freezing darkness for three hours. It is a place where a kea parrot, curious and destructive, lands on your tripod head while you are composing a shot at Homer Tunnel, and suddenly your landscape photograph becomes a wildlife portrait.
New Zealand fits every landscape photography genre into a country roughly the size of Colorado: glaciated fiords, active volcanoes, subtropical forests, dark sky reserves, dramatic coastlines, and alpine terrain that shifts character every thirty kilometers. But the distances between these locations are real, the weather is genuinely changeable, and the light, while extraordinary when it appears, demands patience.
This guide covers both islands over an 18-day expedition itinerary. It is built for the photographer who wants to go beyond the postcard.
South Island: Milford Sound, Mount Cook, Queenstown, and the West Coast
The South Island contains the majority of New Zealand’s marquee landscape photography locations. From the glaciated fiords of Fiordland to the turquoise lakes of the Mackenzie Basin to the rainforested West Coast, the density of photographic subjects per kilometer of road is remarkable.
Sign up to see photography location maps
Milford Sound
GPS: 44.XX°S, 167.XX°E🔒 | Best light: Post-rain clearing, dawn | Difficulty: Easy (road access) to moderate (overnight cruises)
Milford Sound is not a sound. It is a fiord, carved by glaciers during the last ice age, and it is the single most dramatic landscape in New Zealand. Mitre Peak rises 1,692 meters directly from sea level, the walls are near-vertical, and the combination of mist, rain, and occasional clearing light creates conditions that change by the minute.
Here is the counterintuitive truth about Milford Sound: the best photographs happen in the worst weather. Specifically, they happen during the transition from bad weather to good, when the rain stops, clouds begin to lift, and the thousand temporary waterfalls that only exist after heavy rain are still thundering down the fiord walls. This transition window, typically lasting two to four hours, produces the most dramatic images Milford has to offer.

The three-night strategy:
Milford receives approximately 6,800mm of rain annually, roughly 200 rain days per year. A single-day visit has approximately a 45% chance of encountering usable conditions. Three nights raises your probability of catching at least one clearing window to over 85%.
- Base at Milford Sound Lodge or camp at the DOC campground. There is limited accommodation, so book months in advance.
- Monitor metservice.com and Windy.com for the passage of frontal systems. A northwesterly wind shift following rain typically signals clearing.
- When clearing begins: Position yourself at the Milford Sound foreshore (the public wharf area) or take the short walk to the viewpoint overlooking the fiord. Dawn clearings are the most photogenic because the low sun angle catches the waterfall spray.
- Overnight cruise: The overnight cruises (Milford Mariner, Milford Wanderer) anchor in Harrison Cove. Waking on the fiord at dawn, surrounded by waterfalls and mist, provides compositions impossible from shore.
Key compositions:
| Location |
GPS |
Shot |
Lens |
| Milford Foreshore |
44.XX°S, 167.XX°E🔒 |
Mitre Peak reflection |
16-35mm |
| Bowen Falls viewpoint |
44.XX°S, 167.XX°E🔒 |
162m waterfall close-up |
70-200mm |
| Cruise ship deck |
(varies) |
Stirling Falls approach |
24-70mm |
| Homer Tunnel approach |
44.XX°S, 167.XX°E🔒 |
Mountain valley, kea encounters |
24-70mm, 70-200mm |
| Mirror Lakes (en route) |
44.XX°S, 168.XX°E🔒 |
Perfect Reflections at dawn |
16-35mm |
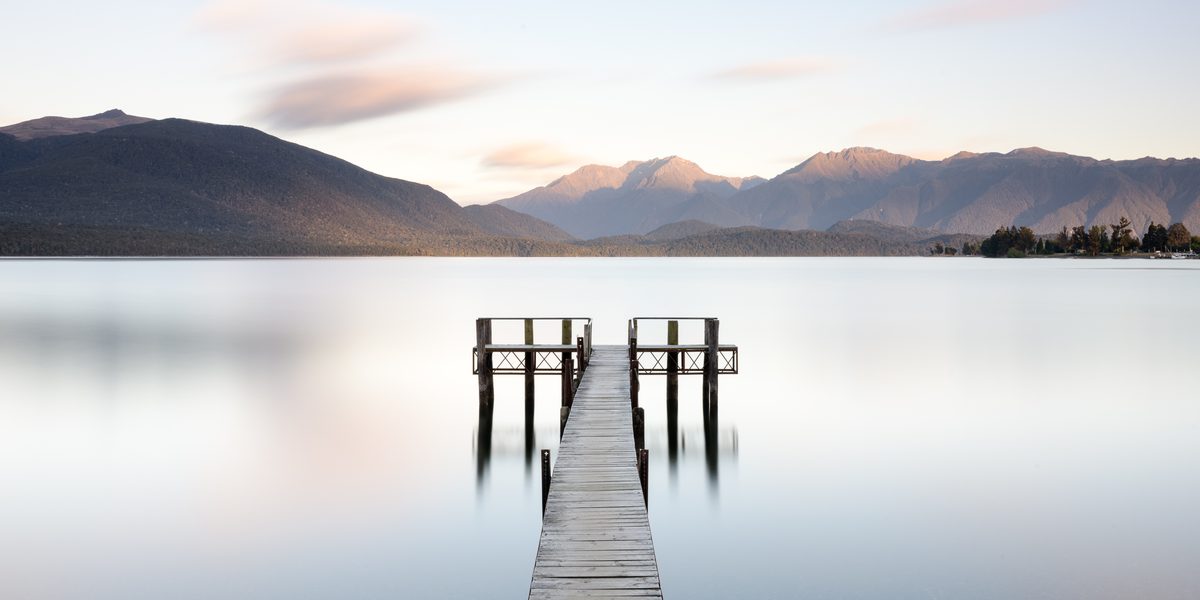
Photo: Mark Denney
Mount Cook / Aoraki
GPS: 43.XX°S, 170.XX°E🔒 | Best light: Dawn, astrophotography | Difficulty: Easy to moderate
Aoraki / Mount Cook is New Zealand’s highest peak at 3,724 meters, and its surrounding national park contains some of the most photogenic glacial terrain in the Southern Hemisphere. The Hooker Valley Track, a gentle three-hour return walk, leads to a glacial lake at the base of Mount Cook that provides the park’s most accessible and powerful composition.
Hooker Valley Track (43.XX°S, 170.XX°E🔒 start): Three swing bridges cross glacial streams on the approach to Hooker Lake. The second bridge, framed by Mount Cook in the background, is a strong mid-track composition. The lake itself, often containing small icebergs, reflects the mountain in still morning conditions.
Mueller Lake (43.XX°S, 170.XX°E🔒 viewpoint): A steeper trail to the Mueller Hut provides elevated views across the Mueller Glacier and lake. The full-day hike to Mueller Hut rewards with sunset and sunrise from 1,800 meters, placing you above the cloud inversions that frequently fill the Hooker Valley.
Tasman Glacier viewpoint (43.XX°S, 170.XX°E🔒): A short walk from the Blue Lakes car park leads to views of the Tasman Glacier terminus lake, the largest glacier in New Zealand. The scale is best captured with a telephoto lens that compresses the massive ice face against the distant mountains.
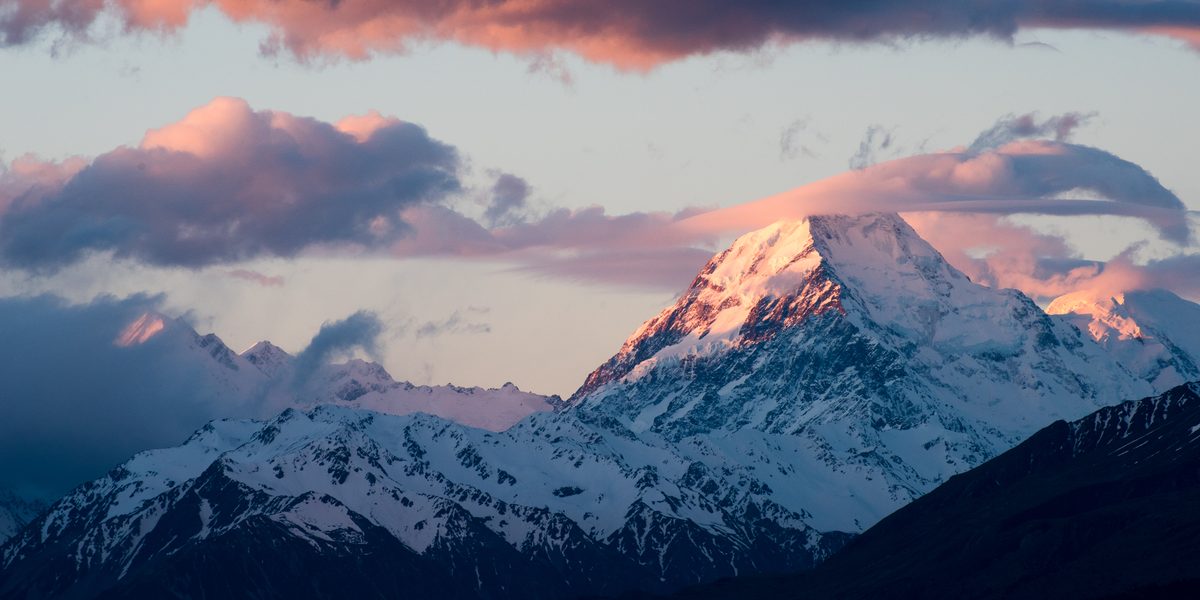
Photo: Mark Denney
Queenstown and the Remarkables
GPS: 45.XX°S, 168.XX°E🔒 | Best light: Sunrise from Queenstown Hill, sunset from Glenorchy | Difficulty: Easy
Queenstown is the tourism hub of the South Island, and while it is not the most photographically original location, it serves as an excellent base for accessing five or six major photography destinations within a ninety-minute drive.
The key compositions from Queenstown:
- Glenorchy Road (45.XX°S, 168.XX°E🔒 to 44.XX°S, 168.XX°E🔒): The 45-minute drive from Queenstown to Glenorchy follows Lake Wakatipu and is lined with mountain viewpoints. Stop at Bennetts Bluff lookout for the elevated lake-and-mountain panorama.
- Paradise (44.XX°S, 168.XX°E🔒): Yes, it is actually called Paradise. The road from Glenorchy continues to a pastoral valley surrounded by beech forest and mountains. The Diamond Lake walk provides an elevated viewpoint.
- The Remarkables (45.XX°S, 168.XX°E🔒): The mountain range southeast of Queenstown catches alpenglow at sunrise. Photograph from the Queenstown lakefront with the mountains reflected in Lake Wakatipu.
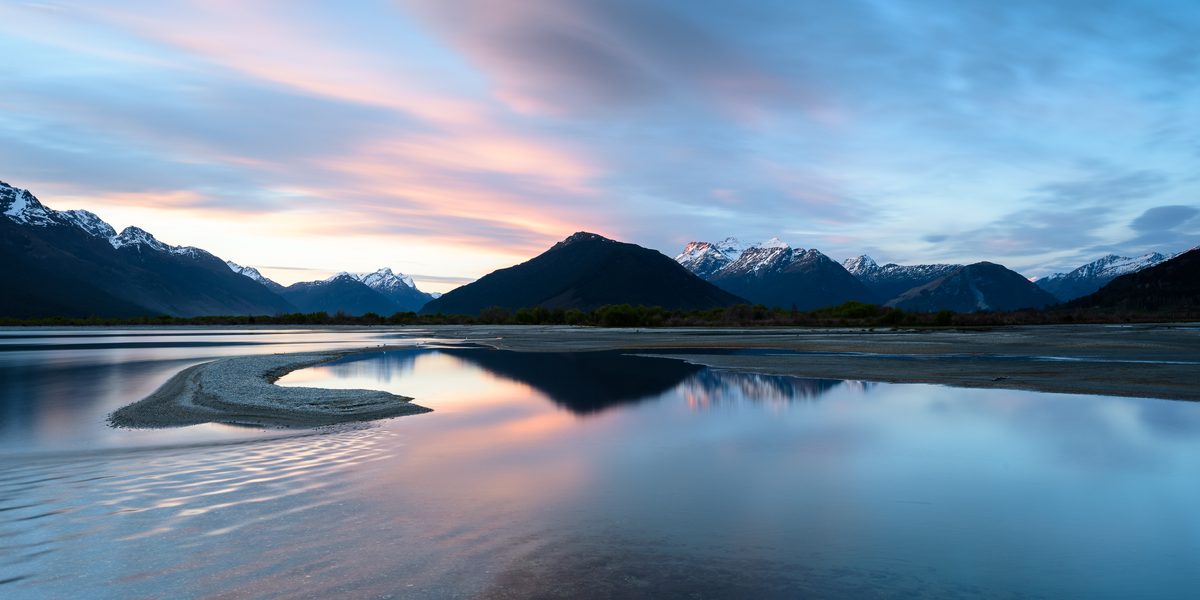
Photo: Mark Denney
The West Coast
The West Coast of the South Island, from Haast Pass to Greymouth, is a corridor of temperate rainforest, glaciers descending to near sea level, and some of the most persistently dramatic weather in the country.
Fox Glacier (43.XX°S, 170.XX°E🔒): The glacier is accessible via a short valley walk to the viewpoint. The blue ice against grey rock and green rainforest creates a color palette unique to this coast. Helicopter tours land on the glacier for close-up ice cave compositions.
Lake Matheson (43.XX°S, 169.XX°E🔒): The famous “mirror lake” that reflects Aoraki / Mount Cook and Mount Tasman. The reflection requires dead calm conditions, which occur most reliably at dawn. The Jetty Viewpoint provides the classic composition. A polarizer is counterproductive here; it removes the reflection.
Bruce Bay (43.XX°S, 169.XX°E🔒): A wild West Coast beach where the Tasman Sea meets driftwood-strewn sand. The light during approaching weather systems, when dramatic clouds stack against the coastline, produces some of the most atmospheric images on the South Island.
North Island: Tongariro, Coromandel, Rotorua, and the Volcanic Plateau
The North Island offers an entirely different photographic character: active volcanism, geothermal otherworlds, subtropical forest, and coastal formations that contrast sharply with the South Island’s glaciated landscapes.
Tongariro National Park
GPS: 39.XX°S, 175.XX°E🔒 | Best: Clear weather (any season) | Difficulty: Moderate to strenuous
Tongariro is a UNESCO dual World Heritage site, recognized for both natural and cultural significance. The volcanic plateau contains three active volcanoes: Ruapehu, Ngauruhoe (the inspiration for Mount Doom in Peter Jackson’s films), and Tongariro itself.
The Tongariro Alpine Crossing (39.XX°S, 175.XX°E🔒 start): This 19.4-kilometer one-way hike crosses the volcanic plateau, passing the Emerald Lakes (vivid turquoise pools in volcanic craters), Red Crater, and views of Ngauruhoe’s perfectly conical summit. The crossing takes 6-8 hours and requires a shuttle.
Photography notes for the Crossing:
- Start at dawn (book the earliest shuttle) to photograph the Emerald Lakes before crowds arrive
- The Red Crater viewpoint looking back toward Ngauruhoe is the signature composition. A wide-angle lens captures the volcanic scale.
- Weather changes rapidly at altitude. Cloud can roll in and obscure everything within minutes. Carry rain gear and be prepared to shoot in mist, which adds atmosphere to the volcanic terrain.
- The Emerald Lakes’ turquoise color is most vivid when illuminated by direct sun against a dark volcanic backdrop. Overcast conditions mute the color significantly.
Mount Ngauruhoe (39.XX°S, 175.XX°E🔒): The symmetrical volcanic cone is best photographed from the Mangatepopo car park at dawn, or from the Whakapapa ski field road at sunset. A 200mm telephoto compresses the cone against colorful sky.
The Coromandel Peninsula
GPS: 36.XX°S, 175.XX°E🔒 | Best: Summer (December through February) | Difficulty: Easy to moderate
The Coromandel offers New Zealand’s most dramatic coastal rock formations, subtropical forest, and a relaxed atmosphere that contrasts with the South Island’s expedition intensity.
Cathedral Cove (36.XX°S, 175.XX°E🔒): A natural rock arch on a white sand beach, accessed via a 45-minute walk from the car park. The arch frames the offshore sea stack, and the morning light (the cove faces east) illuminates the rock face. Low tide reveals more beach and foreground options. This is a heavily visited location; arrive at dawn for uncrowded compositions.
New Chums Beach (36.XX°S, 175.XX°E🔒): Consistently rated one of the most beautiful beaches in the world, and accessible only by foot. The 30-minute walk through native forest opens onto an untouched crescent of sand backed by pohutukawa trees. No facilities, no crowds, no development.
Hot Water Beach (36.XX°S, 175.XX°E🔒): At low tide, geothermal hot water seeps through the sand. Photographers find the most interesting compositions in the steam rising from the beach at dawn, particularly in cooler months when the temperature differential is greatest.
Rotorua and the Volcanic Plateau
GPS: 38.XX°S, 176.XX°E🔒 | Best: Overcast or dawn (steam is most visible) | Difficulty: Easy
Rotorua sits on one of the world’s most active geothermal zones. The landscape of bubbling mud pools, steaming vents, and mineral-stained terraces creates a palette of sulphur yellow, mineral orange, and thermal blue unlike anything else in New Zealand.
Wai-O-Tapu (38.XX°S, 176.XX°E🔒): The most photogenic geothermal park. The Champagne Pool, a 65-meter-wide hot spring rimmed with orange and green mineral deposits, is the signature composition. The Artist’s Palette, a series of colored thermal pools, photographs best in overcast conditions that prevent harsh reflections. The Lady Knox Geyser erupts daily at 10:15 AM.
Whakarewarewa Redwoods (38.XX°S, 176.XX°E🔒): A grove of California redwoods planted in 1901, now towering above the native forest. The Treewalk, a series of suspended bridges through the canopy, is illuminated at night with colored lanterns, creating atmospheric long exposure opportunities.
Wanaka and the Southern Lakes: The Photographer’s Basecamp
Wanaka functions as the South Island’s ideal photography basecamp: quieter than Queenstown, closer to Mount Aspiring National Park, and home to one of the most photographed trees on Earth.
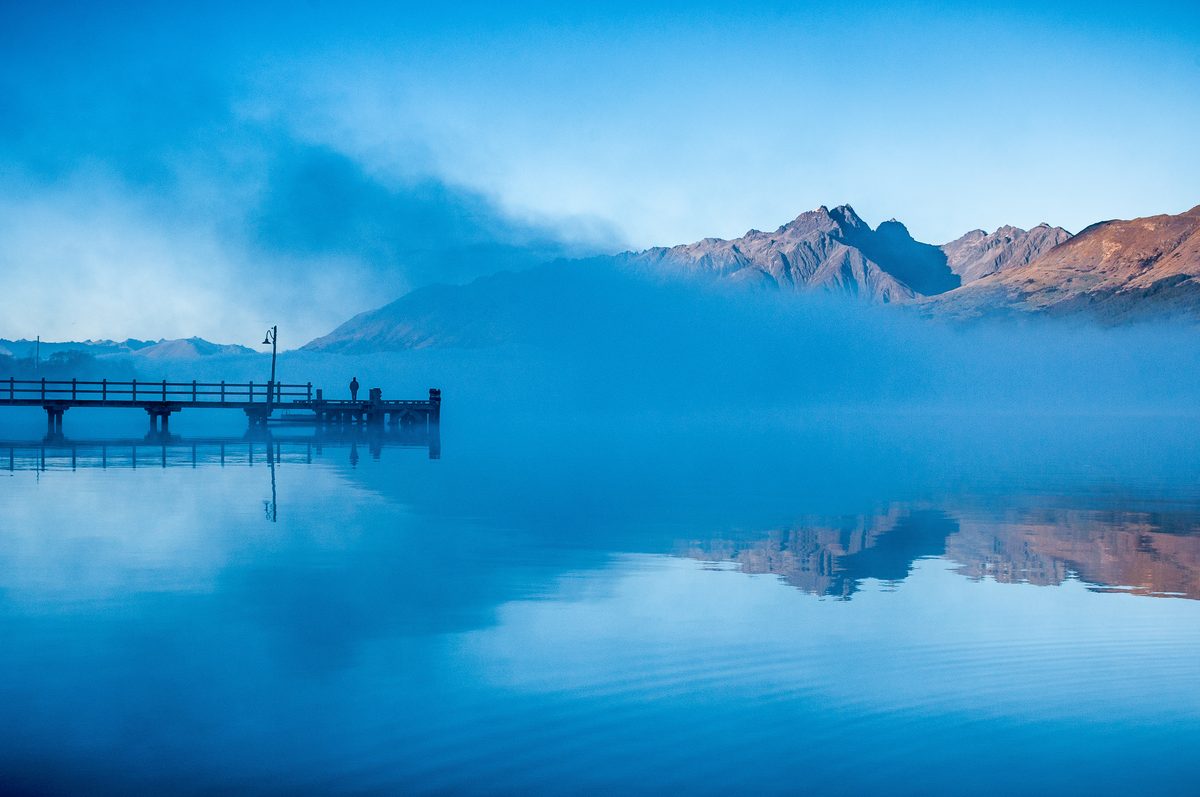
Photo: Mark Denney
That Wanaka Tree
GPS: 44.XX°S, 169.XX°E🔒 | Best: Dawn, all seasons
The lone willow tree standing in Lake Wanaka has become one of the most photographed subjects in the Southern Hemisphere. It is a cliche, and it is beautiful, and photographing it well requires moving beyond the obvious.
The standard composition places the tree centered with the Buchanan Range reflected behind it. To create a distinctive image:
- Shoot during autumn (April-May) when the tree turns golden yellow against blue lake water
- Use a long exposure (2-8 seconds) to smooth the lake surface into a mirror
- Include the Matukituki Valley mountains in the background with a wider focal length
- Photograph during a storm approach when dramatic clouds stack above the mountains
- Position yourself to the right (south) of the standard viewpoint and use the tree as a frame element rather than the central subject
Roy’s Peak
GPS: 44.XX°S, 169.XX°E🔒 | Summit: 1,578m | Hike: 16km return, 5-6 hours
The zigzag trail up Roy’s Peak delivers one of New Zealand’s most iconic viewpoints: a 270-degree panorama encompassing Lake Wanaka, Mount Aspiring, and the Matukituki Valley. The famous composition, a person standing on the ridgeline with the lake curving below, requires reaching the summit or the false summit (which actually provides the better angle for the lake-curve composition).
Timing: Start the hike at 4 AM for a sunrise summit. The pre-dawn climb is steep but straightforward with a headlamp. Sunrise at the summit, with mist in the valleys below, produces the most atmospheric images.
Rob Roy Glacier
GPS: 44.XX°S, 168.XX°E🔒 (trailhead) | Hike: 10km return, 3-4 hours
The Rob Roy Glacier track in the Matukituki Valley leads to a viewpoint beneath a hanging glacier that calves ice into a waterfall-fed pool. The scale is immense: the glacier face is several hundred meters wide, and chunks of ice regularly fall from the face with thunderous reports. A 24-70mm lens captures the glacier in context; a 70-200mm isolates the ice face detail.
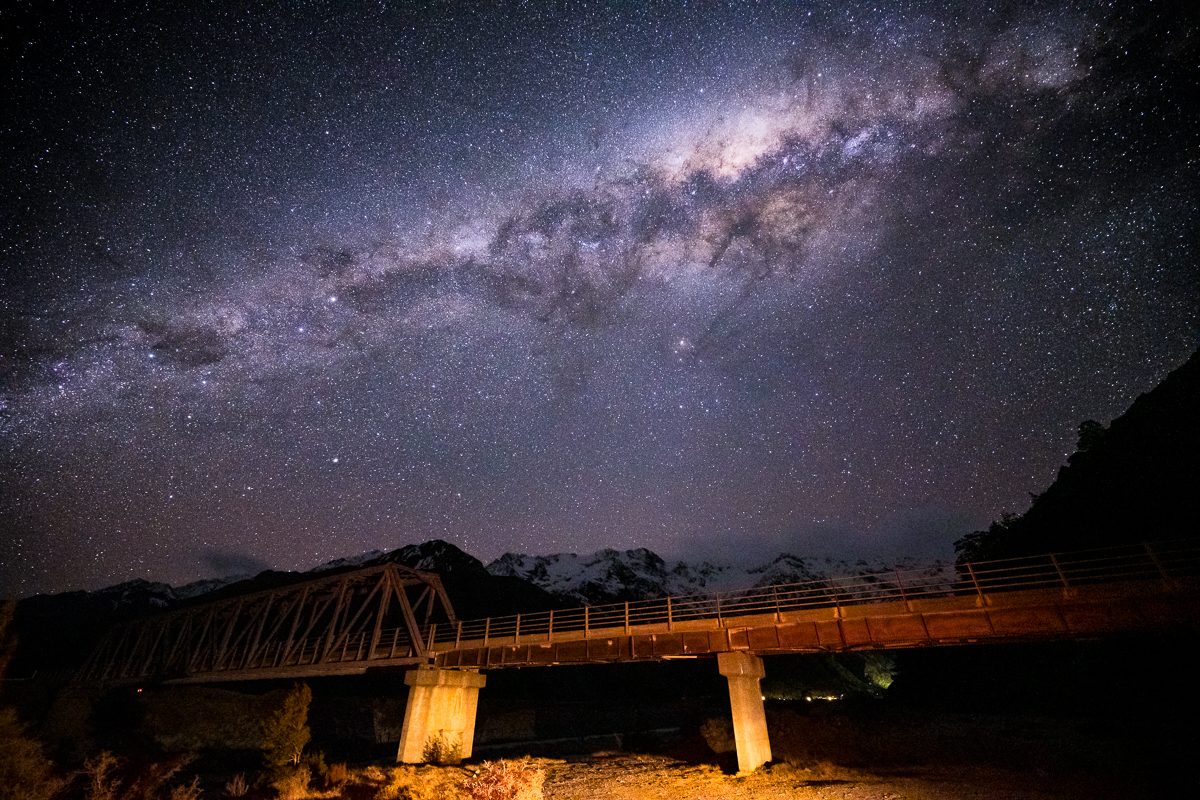
Photo: Mark Denney
Drone Photography in New Zealand: Regulations and Prime Locations
New Zealand is one of the best countries in the world for drone photography, combining dramatic terrain with relatively permissive regulations. However, the rules are specific and enforced.
Civil Aviation Authority (CAA) Rules
- No pilot certificate required for recreational drone use under 25 kilograms
- Maximum altitude: 120 meters above ground level
- Line of sight: Must maintain visual contact with the drone at all times
- Distance from people: Must not fly over people without their consent
- Distance from aerodromes: 4 kilometers from controlled airports without ATC permission
- Controlled airspace: Check the Airshare website (airshare.co.nz) for restricted zones
- DOC Conservation Land: Drone use on Department of Conservation land requires a concession unless you meet specific exemptions for personal recreational use under Part 101
Prime Drone Locations
| Location |
Why |
Restrictions |
| Glenorchy / Paradise |
Epic mountain-lake compositions |
Minimal; check airspace |
| Wanaka lakefront |
That Wanaka Tree from above, autumn color |
Town airspace; check Airshare |
| Canterbury Plains |
Braided rivers, farmland patterns |
Open; few restrictions |
| Coromandel coastline |
Sea stacks, arches, coastal patterns |
Check DOC concession areas |
| Mackenzie Country |
Turquoise lakes, tussock patterns |
Check Aoraki NP boundaries |
| Queenstown approaches |
Controlled airspace – very restricted |
Avoid or obtain ATC permission |
National Parks and DOC land: The rules are nuanced. In general, recreational drone use for personal purposes is allowed on DOC conservation land under Part 101 rules. However, specific areas within national parks may have additional restrictions, and commercial drone use always requires a concession. Check with the local DOC office before flying.
Night Sky: Mount John Observatory and the Aoraki Mackenzie Dark Sky Reserve
GPS: 43.XX°S, 170.XX°E🔒 (Mount John) | Best: March through September (Milky Way core season)
The Aoraki Mackenzie International Dark Sky Reserve, one of the world’s largest, covers 4,367 square kilometers of the Mackenzie Basin. Light pollution is virtually nonexistent, and the Bortle scale readings consistently reach Class 1, the darkest classification. For astrophotographers, this is one of the premier destinations on Earth.
What Makes the Mackenzie Basin Special
The combination of dark skies, dramatic foreground (Lake Tekapo, Mount Cook, lupins in season), and Southern Hemisphere exclusives (Magellanic Clouds, the Southern Cross, the galactic center passing nearly overhead) creates astrophotography opportunities unavailable in the Northern Hemisphere.

The Key Night Sky Locations
Church of the Good Shepherd (44.XX°S, 170.XX°E🔒): The tiny stone church on the shore of Lake Tekapo is the most photographed night sky composition in New Zealand. The Milky Way arcs over the church with the lake reflecting stars. Arrive two hours before midnight during Milky Way season (March through September) to secure a position and set up. The church is illuminated by a small exterior light that provides warm contrast against the cool star field.
Note: Tripod use and flash are now restricted at the Church of the Good Shepherd due to photographer overload. Check current regulations. Alternative compositions from the Tekapo lakefront, 200 meters north, provide equally strong foreground with fewer restrictions.
Mount John Summit (43.XX°S, 170.XX°E🔒): The observatory summit provides 360-degree views with the Mackenzie Basin stretching to the horizon. The summit is accessible during the day and via guided stargazing tours at night. Independent night access may be restricted; check with Dark Sky Project.
Lake Pukaki viewpoint (44.XX°S, 170.XX°E🔒): The turquoise glacial lake stretches toward Mount Cook, creating a foreground that glows faintly even under starlight. The southern sky wheels above the mountain, and on clear nights, the Milky Way appears to pour from the summit of Aoraki into the lake.
Astrophotography Settings for the Mackenzie Basin
| Target |
Lens |
Aperture |
Shutter |
ISO |
Notes |
| Milky Way panorama |
14-24mm |
f/2.8 |
20-25 sec |
3200-6400 |
Use 500 rule for max exposure |
| Star trails (stacked) |
14-24mm |
f/2.8 |
30 sec x 120+ |
1600 |
1-sec gap, stack in StarStax |
| Magellanic Clouds |
35-50mm |
f/1.8 |
15-20 sec |
3200 |
Tighter framing, more detail |
| Church + Milky Way |
14mm |
f/2.8 |
20 sec |
6400 |
Focus on church, verify stars |
The key advantage of Southern Hemisphere astrophotography: the Milky Way’s galactic center passes almost directly overhead at New Zealand’s latitude (approximately 44 degrees S). In the Northern Hemisphere, it never rises above about 25 degrees altitude from most locations. This overhead passage means the core is photographed through less atmosphere, producing brighter, more detailed images with less atmospheric distortion.
Wildlife: Kea, Albatross, Penguins, and Dolphin Encounters
New Zealand’s wildlife evolved in isolation for 80 million years, producing species found nowhere else on Earth. For photographers, the accessible, habituated nature of many species makes New Zealand unusually rewarding.
Kea (Mountain Parrot)
Where: Arthur’s Pass, Homer Tunnel, Milford Road | When: Year-round
The world’s only alpine parrot is olive green with brilliant orange underwing feathers, curious to the point of destructiveness, and photogenic in the extreme. Kea will approach photographers, land on equipment, and disassemble anything left unattended. Use a 70-200mm or 24-70mm, as the birds often approach to within two meters.
Field note: Kea are endangered. Do not feed them, and do not leave food or equipment accessible. They will eat rubber seals from car doors and tripod feet.
Royal Albatross
Where: Taiaroa Head, Dunedin (45.XX°S, 170.XX°E🔒) | When: November through September (breeding season)
The Royal Albatross Colony at Taiaroa Head is the only mainland breeding colony of any albatross species in the world. Guided tours provide close views of nesting adults and chicks. A 200-600mm telephoto captures the birds in flight with the Pacific as backdrop. The colony is managed by DOC with strict access controls; book guided tours in advance.
Penguins
Yellow-eyed Penguin (Hoiho): The world’s rarest penguin. Viewing hides at Penguin Place (private reserve near Dunedin) and Curio Bay (Catlins) provide close encounters without disturbance. A 200-600mm lens from the hides fills the frame.
Blue Penguin (Little Penguin): Evening arrivals at Oamaru’s Blue Penguin Colony (45.XX°S, 170.XX°E🔒) provide nightly viewing. Photography restrictions apply during the evening parade; check current rules.
Dolphins
Kaikoura (42.XX°S, 173.XX°E🔒) offers both dusky dolphin encounters and whale watching. Dolphins regularly bow-ride alongside boats, providing opportunities for close action photography. A 70-200mm with fast autofocus captures leaping dolphins against the Kaikoura Range backdrop.
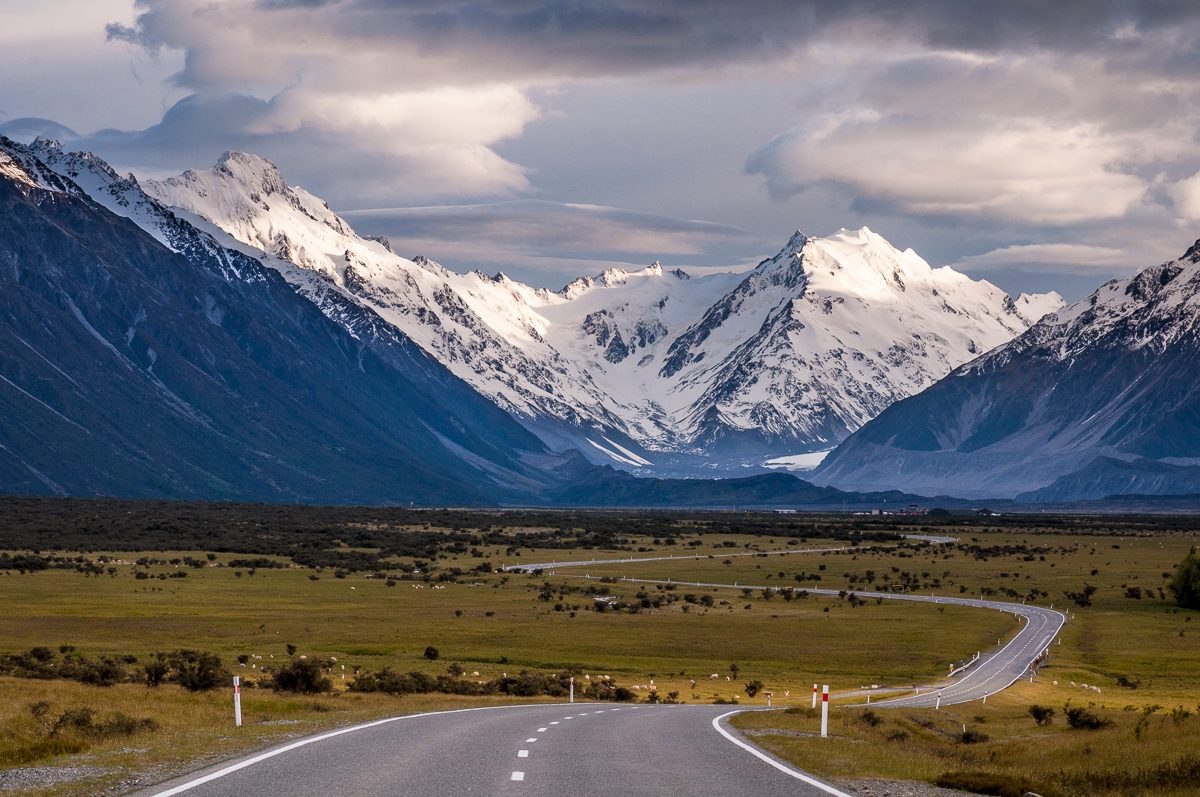
Photo: Mark Denney
Weather Patterns and Seasonal Strategy
New Zealand’s weather is driven by the roaring forties, the band of westerly winds that circle the Southern Hemisphere at approximately 40 to 50 degrees latitude. Weather systems arrive from the west, hitting the Southern Alps and dumping massive rainfall on the West Coast while leaving the eastern rain shadow comparatively dry.
The West Coast vs. East Coast Divide
| Factor |
West Coast (Milford, Fox) |
East Coast (Mt Cook, Tekapo) |
| Annual rainfall |
5,000-7,000mm |
500-700mm |
| Rain days per year |
180-200 |
80-100 |
| Cloud cover |
Frequent, dramatic |
More frequent clearing |
| Best strategy |
Wait for clearing windows |
More reliable conditions |
| Photography character |
Moody, atmospheric, waterfalls |
Clear skies, astrophotography |
This divide is the single most important weather fact for planning your itinerary. Do not schedule your astrophotography night at Milford Sound. Do not expect reliably clear conditions at Fox Glacier. Place your night sky work at Tekapo or Mount Cook village, and embrace the rain at Milford Sound as a photographic asset.
Seasonal Weather Overview
Summer (December through February): Warmest and driest, with the longest days (16 hours of daylight at the summer solstice). The extended daylight means brief golden hours. Crowds peak. Best for: West Coast glacier access, Tongariro Crossing, coastal photography.
Autumn (March through May): Stable weather patterns, shorter days producing longer golden hours, autumn color in Central Otago (Arrowtown, Cromwell, Wanaka). The Milky Way core begins its season. Best overall photography season by a significant margin.
Winter (June through August): Snow on the mountains, dramatic skies, few tourists. Short days mean early sunsets and late sunrises, extending blue hour and golden hour. The Milky Way is at its best. Some roads and tracks close. Best for: astrophotography, snow-capped mountain landscapes.
Spring (September through November): Wildflowers, lambing season, increasingly stable weather. Lupins bloom at Lake Tekapo in November-December. Variable conditions produce dramatic skies. Best for: wildlife photography, spring wildflowers, fewer crowds than summer.
Sample 18-Day Two-Island Photography Itinerary
This itinerary runs north to south, starting in Auckland and ending in Queenstown. It is designed for autumn (March through April) for optimal conditions across all photographic subjects.
| Day |
Location |
Focus |
Accommodation |
| 1 |
Arrive Auckland |
Rest, gear check |
Auckland hotel |
| 2 |
Drive to Coromandel |
Cathedral Cove (afternoon), Hot Water Beach |
Coromandel accommodation |
| 3 |
Coromandel |
Dawn at Cathedral Cove, New Chums Beach |
Coromandel accommodation |
| 4 |
Drive to Rotorua |
Wai-O-Tapu (afternoon), Redwoods night treewalk |
Rotorua hotel |
| 5 |
Drive to Tongariro |
Rotorua morning, drive south, sunset on Ngauruhoe |
National Park village |
| 6 |
Tongariro Crossing |
Full day hike and shoot (dawn shuttle) |
National Park village |
| 7 |
Drive to Wellington |
Morning Tongariro reshoot, afternoon drive, evening ferry booking |
Wellington hotel |
| 8 |
Ferry to South Island |
Interislander ferry (photograph the Sounds), drive to Kaikoura |
Kaikoura hotel |
| 9 |
Kaikoura |
Whale watching boat, dolphin encounter, coastal sunset |
Kaikoura hotel |
| 10 |
Drive to Mount Cook |
Via Christchurch, Lake Tekapo lupins (if Nov-Jan), Church at night |
Tekapo accommodation |
| 11 |
Mount Cook |
Hooker Valley Track (dawn), Tasman Glacier viewpoint |
Mount Cook village |
| 12 |
Mount Cook / night sky |
Mueller Lake hike or Kea Point, astrophotography at Lake Pukaki |
Mount Cook village |
| 13 |
Drive to Wanaka |
That Wanaka Tree (dawn), town exploration |
Wanaka accommodation |
| 14 |
Wanaka |
Rob Roy Glacier Track, Lake Wanaka sunset |
Wanaka accommodation |
| 15 |
Drive to Milford |
Via Te Anau, Mirror Lakes, Homer Tunnel, arrive Milford |
Milford Sound Lodge |
| 16 |
Milford Sound |
Overnight cruise or dawn foreshore photography |
Milford Sound Lodge |
| 17 |
Milford / Queenstown |
Morning Milford session, drive to Queenstown via Glenorchy |
Queenstown hotel |
| 18 |
Queenstown |
Bennetts Bluff dawn, Remarkables sunrise, departure |
– |
Itinerary Notes
- Days 15-17 are the Milford Sound block. Three days provides the best chance of catching a clearing window. If conditions are poor on Day 15, you have two backup days.
- The Interislander ferry (Day 8) crosses Cook Strait and navigates the Marlborough Sounds. The scenery from the deck is worth photographing, and the crossing takes approximately 3.5 hours.
- Rental vehicle: A campervan offers maximum flexibility for dawn shoots and overnight stays at remote locations. Standard rental cars work but limit spontaneous overnight options. Book a high-clearance vehicle if you plan to access unpaved roads.
- Fuel: Fill up in every town. Some South Island stretches have 100+ kilometers between fuel stations.
- This itinerary can compress to 14 days by eliminating the Coromandel (Days 2-3) and reducing the Milford block to two days. The cost is less insurance against Milford weather and fewer North Island coastal images.
Equipment Recommendations for New Zealand
New Zealand demands weather-resistant gear. Rain can arrive without warning on either coast, and the West Coast receives rain more days than not.
The New Zealand Photography Kit
| Item |
Recommendation |
Why |
| Body |
Weather-sealed mirrorless (Nikon Z8 or equivalent) |
Rain, spray, dust protection |
| Wide zoom |
14-24mm f/2.8 |
Fiords, night sky, volcanic landscapes |
| Standard zoom |
24-70mm f/2.8 |
General landscape, compositions |
| Telephoto |
100-400mm or 200-600mm |
Wildlife (penguins, albatross, dolphins, kea) |
| Fast prime |
14mm f/1.8 or 20mm f/1.8 |
Astrophotography at Tekapo/Mt Cook |
| Tripod |
Carbon fiber, wind-rated |
Night sky, long exposure, Milford dawn |
| Drone |
Sub-250g (Mini 4 Pro) or registered heavier model |
Aerial landscapes, coastal compositions |
| Filters |
Polarizer, 6-stop ND, 3-stop soft GND |
Lake reflections, waterfalls, sky balance |
| Rain protection |
Rain sleeves x6, pack cover, dry bags |
West Coast and Milford conditions |
| Intervalometer |
For star trail stacking |
Tekapo/Mt Cook night sessions |
The Polarizer Paradox
New Zealand’s turquoise glacier-fed lakes (Tekapo, Pukaki, Wanaka, Wakatipu) photograph best with a polarizer that cuts surface glare and deepens the apparent color. But at lakes used for reflection photography (Matheson, Mirror Lakes), a polarizer destroys the reflection. Carry one, but be deliberate about when you use it.
Rain Protection Strategy
On the West Coast and at Milford Sound, “weather-sealed” is not sufficient. You need active rain protection:
- Carry disposable rain sleeves and replace them after each heavy session
- Bring a full-size towel specifically for drying gear
- Store all electronic equipment in dry bags inside your camera bag
- Keep one lens cloth in an inside jacket pocket so it stays dry and warm
- Change lenses under cover (inside the car, under a jacket) to prevent water ingress on the sensor
As Galen Rowell wrote in Mountain Light, the most powerful landscape photographs often emerge from the worst conditions. New Zealand’s West Coast is living proof.
Exercises for New Zealand-Ready Photography
Exercise 1: The Long Exposure Lake Drill
Find a local lake or pond. Practice 2-second, 8-second, and 30-second exposures using ND filters. Compare the surface texture at each duration. The goal is developing an intuitive sense of which exposure length produces the reflection quality you want, so you make this decision instantly when standing at Lake Matheson at dawn.
Exercise 2: Night Sky Familiarization
Download the Stellarium app and learn the Southern Hemisphere constellations: the Southern Cross, Centaurus, and the positions of the Large and Small Magellanic Clouds. Practice finding south celestial pole using the Southern Cross pointer method. If you arrive at Tekapo unable to locate your targets, you waste precious dark-sky hours.
Exercise 3: Wildlife Autofocus Proficiency
Visit a local zoo or bird sanctuary. Practice tracking erratically moving birds with your camera’s continuous autofocus system. Set your AF area to a zone or dynamic group, and practice acquiring focus on a moving subject, losing it, and reacquiring. This motor skill transfers directly to photographing kea, dolphins, and albatross in New Zealand.
Exercise 4: The Three-Day Weather Patience Test
Choose a local location and commit to photographing it on three consecutive mornings regardless of weather conditions. Photograph in rain, overcast, fog, and whatever else arrives. The goal is building comfort with bad weather and discovering that some of your strongest images come from the conditions you would previously have stayed in bed for. This mental shift is essential for Milford Sound.
Conclusion
New Zealand does not photograph the same way twice. The morning mist at Milford Sound that produces the image of your career may not reappear for weeks. The clearing window that reveals Mount Cook above a sea of clouds may last twenty minutes. The kea that lands on your tripod and stares into your lens with those knowing, intelligent eyes may fly away before you press the shutter.
The photographers who bring home the strongest New Zealand work share a common strategy: they build time into their itineraries, they stay longer than they think they need to at each location, and they treat weather not as an obstacle but as the primary creative variable. The rain that drives most tourists indoors is the rain that fills Milford’s thousand waterfalls. The cloud that obscures Mount Cook at noon may lift at sunset and produce the most dramatic alpenglow of the season.
Stay longer. Wake earlier. Embrace the weather. New Zealand rewards the patient photographer with images that no amount of post-processing can fabricate and no quick visit can capture.