The Weather Will Change Before You Finish Reading This Sentence
You are standing at the edge of a cliff on Vagar Island, watching Mulafossur waterfall pour directly into the North Atlantic. The composition is set: 24mm, f/8, foreground grass bending in the wind, the cascade framed against Mykines Island on the horizon. You press the shutter. Two frames in, a wall of fog rolls up the cliff face and erases everything. The waterfall vanishes. Mykines vanishes. Your own hand vanishes.
Seven minutes later, the fog lifts, the sun breaks through, and the scene returns with a quality of light so clear and directional that it looks artificial. This cycle will repeat a dozen times before you leave this spot.
This is the Faroe Islands. Eighteen volcanic islands at 62 degrees north, midway between Norway and Iceland in the North Atlantic. The landscape is otherworldly: sheer basalt cliffs dropping 400 meters into the ocean, waterfalls that pour directly off cliffs into the sea, grass-roofed villages clinging to hillsides above fjords, and sea stacks that rise from the water like the ruins of a drowned cathedral. The weather is relentless, unpredictable, and ultimately the reason the photographs from these islands look unlike anything else on Earth.
Every serious landscape photographer should visit the Faroes at least once. But arriving without preparation means spending your time reacting to conditions rather than working with them. This guide covers the locations, the timing, the drone regulations, and the field strategy that transforms a frustrating week of weather-chasing into a productive expedition.
Sign up to see photography location maps
Vagar Island: Where the Icons Live
Vagar is where most photographers begin, and for good reason. The island contains two of the most photographed locations in the entire North Atlantic, and both are accessible within minutes of Vagar Airport.
Gasadalur and Mulafossur Waterfall
GPS: 62.XX°N, 7.XX°W🔒 | Hike: 5-minute walk from parking | Best light: Morning to midday (east-facing cliff)
Mulafossur is the image that put the Faroe Islands on every landscape photographer’s radar. A waterfall drops roughly 60 meters from the edge of a basalt cliff directly into the ocean, with the tiny village of Gasadalur perched on the grassy plateau above. It is one of those rare locations that delivers in person exactly what it promises in photographs.
The standard composition shoots from the southern cliff edge, looking north along the coastline with the waterfall in the mid-ground and Mykines Island on the horizon. At 24mm to 35mm, you capture the full scene with enough foreground interest. At 70-200mm, you isolate the waterfall against the ocean for a more intimate frame.
Wind is the variable that changes everything here. On calm days, the waterfall falls straight down in a clean column. In moderate wind (which is most days), the water arcs and sprays sideways. In strong wind, the waterfall blows upward and disperses before reaching the ocean. All three conditions produce compelling images, but they require different shutter speeds. A 1/4-second exposure smooths a calm waterfall into silk. A 1/500-second exposure freezes the chaotic spray of a wind-blown fall. Both work. Neither is wrong.
Drone note: You can fly from the cliff area south of Gasadalur, but you must maintain 150 meters from the village itself. Launch from the hiking trail or cliff edge rather than the parking lot near the houses.
Traelanipa and Sorvagsvatn
GPS: 62.XX°N, 7.XX°W🔒 | Hike: 45 minutes one way (200 DKK fee) | Best light: Afternoon
Sorvagsvatn is the largest lake in the Faroe Islands, and from Traelanipa (the Slave Cliffs), it creates one of photography’s most famous optical illusions: the lake appears to hover hundreds of meters above the ocean. In reality, the lake surface sits only 30 meters above sea level, but the cliffs on the ocean side drop 142 meters, and the forced perspective from Traelanipa exaggerates the height difference dramatically.
The classic composition requires a wide-angle lens (16-24mm) shot from the cliff edge, including the lake surface, the ocean far below, and the cliff face between them. Include a human figure on the cliff edge for scale. Without a scale reference, the illusion loses its impact because the viewer cannot process the height relationship.
Critical warning: Drones are prohibited at Traelanipa. The entire area falls within the 5-kilometer no-fly zone around Vagar Airport (FAE). This catches many photographers off-guard because the airport feels far away. It is not. Check the diagram below for details.

Drangarnir and Tindholmur Sea Stacks
Access: Boat tour from Sorvagur or Bour | Best light: Late evening, west-facing
Drangarnir is a pair of sea stacks connected by a natural arch, rising from the ocean between Vagar and the uninhabited island of Tindholmur. From the right angle, the larger stack frames Tindholmur’s jagged silhouette through the arch. It is a composition that works at any focal length, from wide establishing shots to telephoto compression that stacks the elements.
The boat tours from Sorvagur provide the best vantage points, and the captains know the photography angles. A 70-200mm lens on the boat gives you the most compositional flexibility.
Drone opportunity: This is one of the best drone locations in the Faroes. You are over open ocean, well away from villages and the airport zone. A drone at 80-100 meters altitude reveals the scale of the sea stacks against the ocean in a way that no ground-based or boat-based angle can match. Fly from the boat or from the cliffs above Bour, keeping clear of the village.
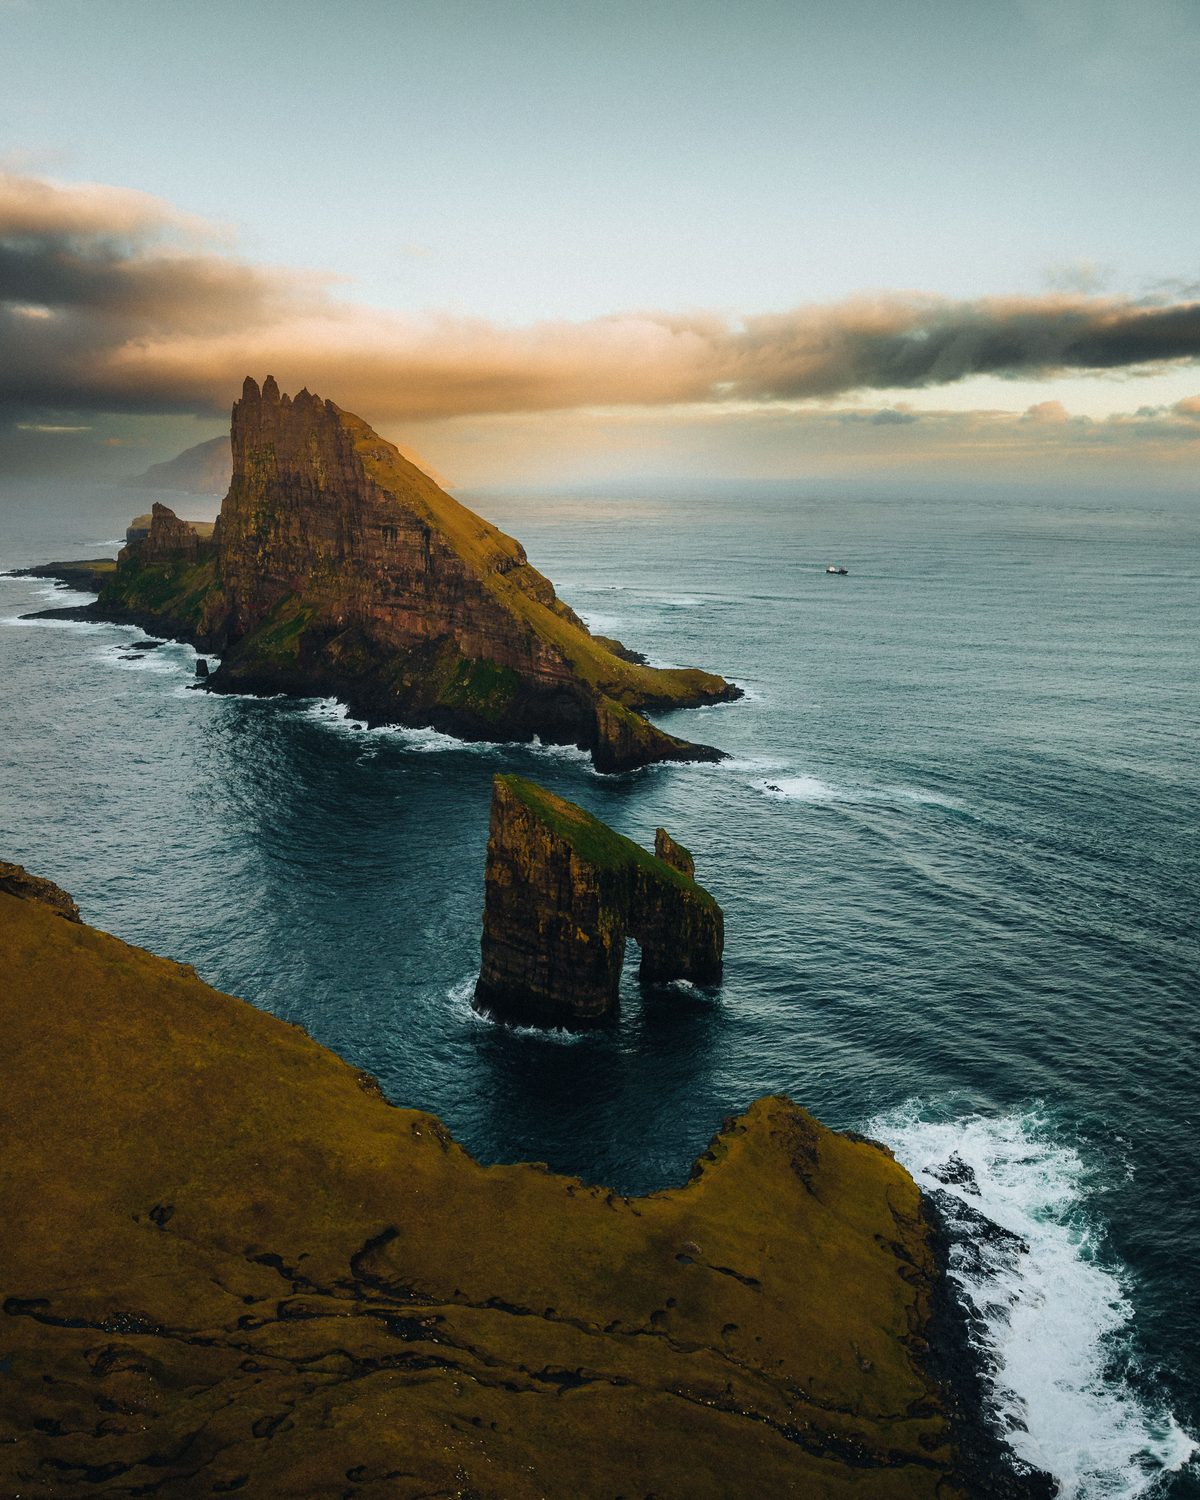
Photo: Ronald Soethje
Streymoy: Villages, Cliffs, and Tidal Light
Streymoy is the largest island and home to the capital, Torshavn. More importantly for photographers, it contains Saksun, one of the most photogenic villages in the North Atlantic.
Saksun Village and Tidal Lagoon
GPS: 62.XX°N, 6.XX°W🔒 | Access: Road from Torshavn, 45 min | Best light: Low tide for lagoon access
Saksun sits in a natural amphitheater of steep mountains surrounding a tidal lagoon. At high tide, the lagoon fills with seawater from the Atlantic, turning the valley floor into a mirror. At low tide, the water drains to reveal a black sand beach surrounded by cliffs and turf-roofed houses. Both states are photographically compelling, but they demand different approaches.
High tide: Shoot the village reflected in the lagoon from the hillside above. A 35mm to 50mm lens captures the symmetry of the reflected mountains and the cluster of turf-roofed buildings. The key is finding a calm moment between wind gusts when the water surface settles.
Low tide: Descend to the beach level and shoot upward toward the village with the dark sand as foreground. The exposed tidal channels create leading lines that pull the viewer toward the settlement. A polarizer cuts glare from wet sand and saturates the moss and grass on the surrounding slopes.
Check tide times before visiting. The difference between a productive session at Saksun and a wasted trip is entirely determined by whether you arrive at the right tidal state for your intended composition.
Vestmanna Bird Cliffs
Access: Boat tour from Vestmanna, ~2 hours | Best time: May through August (breeding season)
The Vestmanna cliffs rise 600 meters from the ocean and host thousands of nesting seabirds, including puffins, guillemots, and fulmars. The boat tours navigate into narrow channels between the cliff faces, where you shoot almost straight up at birds wheeling overhead.
Lens recommendation: Bring a 100-400mm or 200-600mm for individual bird portraits and nesting detail. But do not neglect the wide-angle perspective: a 16-35mm looking straight up inside a narrow cliff channel with birds silhouetted against the sky creates a vertigo-inducing composition.
Drone restriction: Do not fly near the bird cliffs during breeding season. This is both a regulation and an ethical imperative. Drones cause panic among nesting birds, leading to egg loss and chick mortality.
Kirkjubour Medieval Ruins
GPS: 61.XX°N, 6.XX°W🔒 | Access: Road from Torshavn, 20 min | Best light: Late afternoon
Kirkjubour is the oldest cultural site in the Faroe Islands, with a partially ruined medieval cathedral (Magnus Cathedral, begun in 1300 and never completed) and a farm building, Roykstovan, that has been continuously inhabited since the 11th century. The roofless cathedral walls frame the sky, the fjord, and the distant islands.
Photograph the ruins with a 24-35mm lens, using the stone walls as natural frames. The arched windows of the cathedral create stunning frames for the ocean beyond. Late afternoon light rakes across the stone surfaces and emphasizes texture.
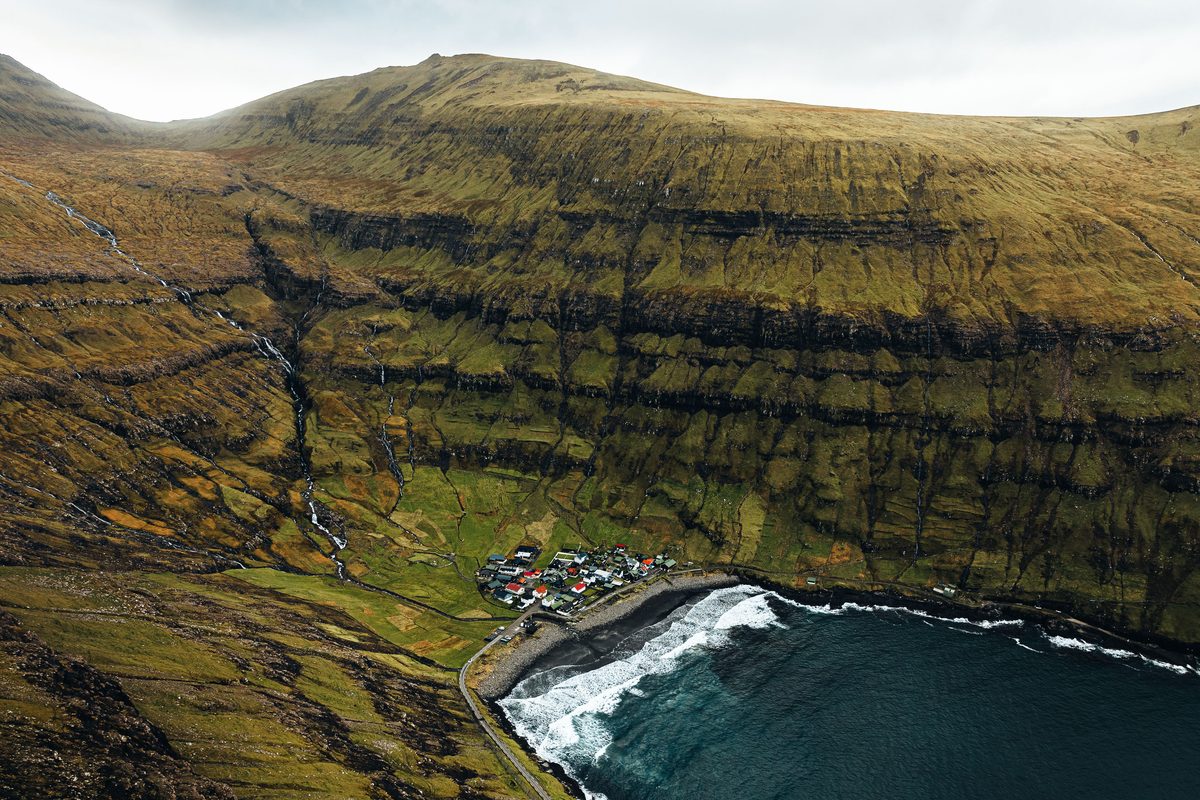
Photo: Ronald Soethje
Northern Islands: Dramatic Edges
Tjornuvik and Risin og Kellingin
GPS: 62.XX°N, 6.XX°W🔒 | Access: Road from Torshavn via tunnel, 1 hour | Best light: Sunset, northwest-facing
Tjornuvik is a small village at the northern tip of Streymoy, facing a black sand beach with views of Risin og Kellingin, two famous sea stacks rising 71 and 68 meters from the ocean. According to Faroese legend, these are a giant and a witch turned to stone while trying to drag the islands to Iceland.
The beach provides excellent foreground for compositions anchored by the sea stacks. At 70mm, you compress the stacks against the beach and village. At 24mm, you include the entire sweep of the bay with wave patterns on the black sand.
Long exposure opportunity: A 2-4 second exposure with a 6-stop ND filter smooths the North Atlantic waves into a misty veil around the base of the sea stacks. Shoot during the receding wave for directional flow lines in the foreground.
Drone: Fly from the beach, keeping 150 meters from the village. An altitude of 60-80 meters reveals the hexagonal basalt patterns in the black sand that are invisible from ground level.
Gjogv Natural Harbor
GPS: 62.XX°N, 6.XX°W🔒 (Eysturoy) | Hike: Short walk from village | Best light: Morning
Gjogv (pronounced “Jev”) is named after its defining feature: a narrow natural gorge cut into the basalt coastline that serves as a natural harbor. The gorge is roughly 200 meters long and only 15 meters wide, with vertical walls and the open North Atlantic crashing at its mouth.
From above, the gorge is a compositional gift: a strong leading line cutting from the ocean into the land, with the tiny village perched at its inland end. A drone at 60-80 meters directly above the gorge captures this geometry perfectly. From ground level, stand at the seaward end and shoot up the gorge toward the village using a 35-50mm lens.
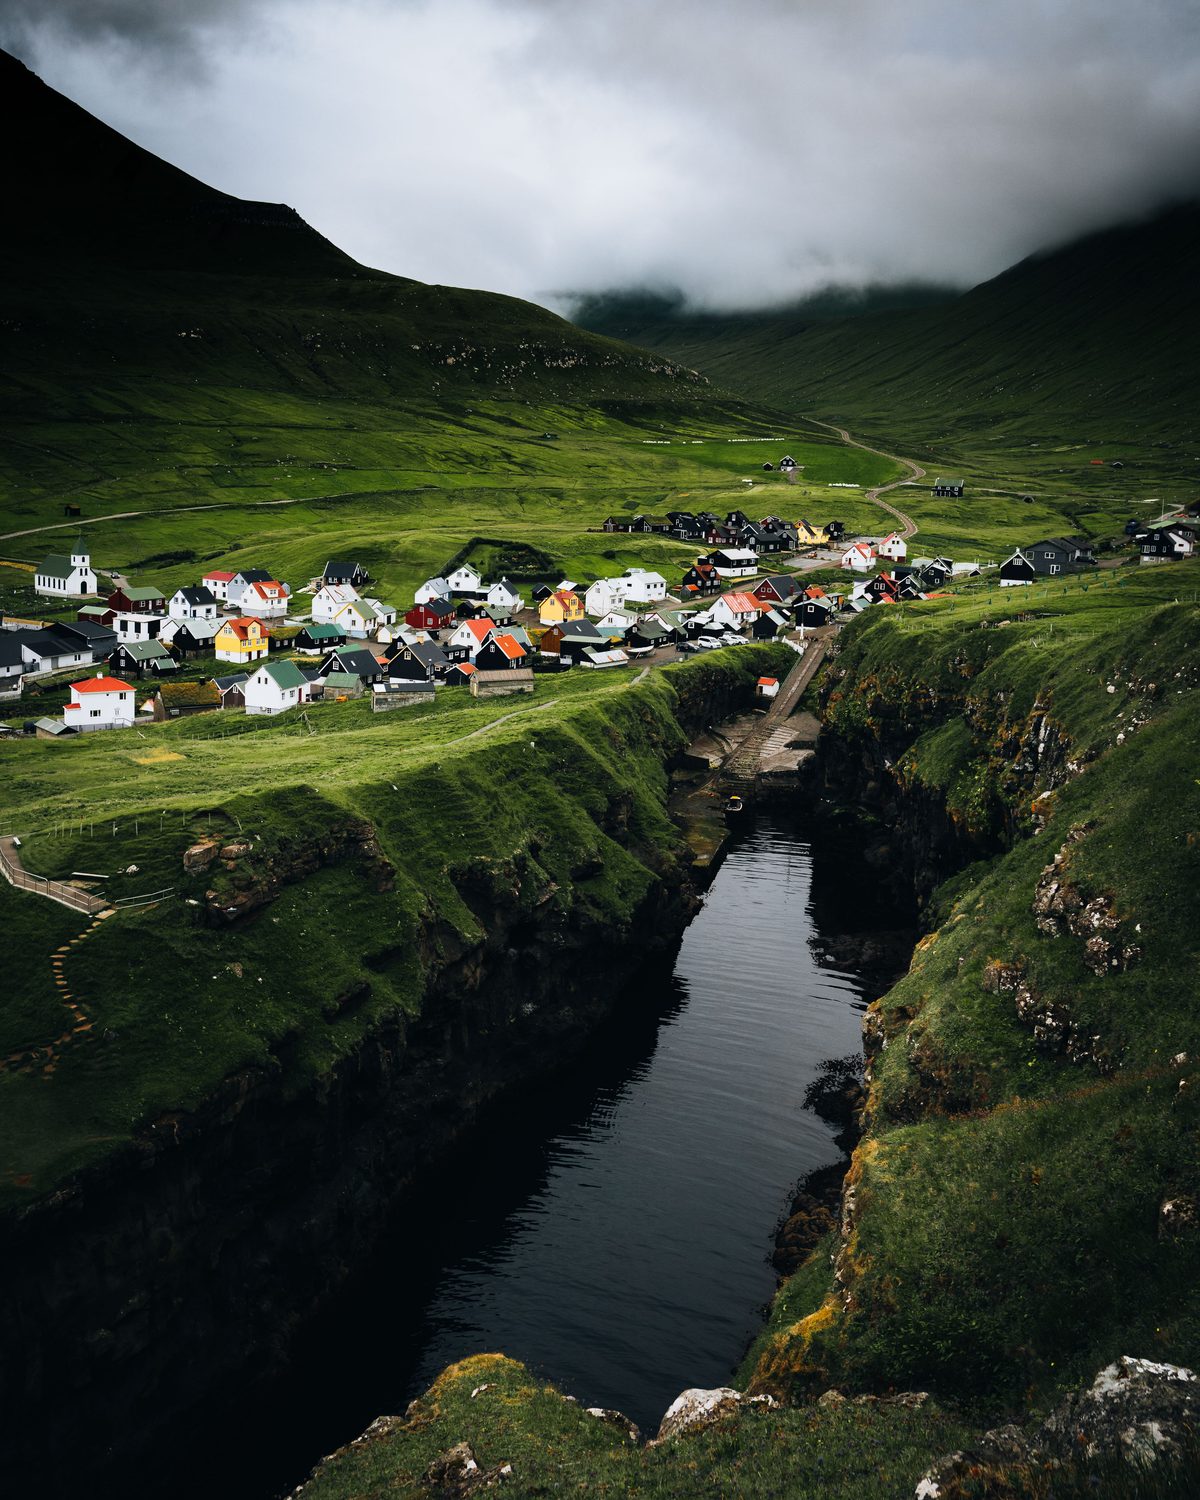
Photo: Ronald Soethje
Slattaratindur: The Highest Point
GPS: 62.XX°N, 6.XX°W🔒 (Eysturoy) | Hike: 1-2 hours from road | Best conditions: Clear day
At 880 meters, Slattaratindur is the highest peak in the Faroe Islands. On a clear day, the summit offers panoramic views across multiple islands, fjords, and the open ocean. The hike is straightforward but exposed, and conditions at the summit can be dramatically different from the trailhead.
This is a dawn or midnight-sun location. In June, the sun barely dips below the horizon, and from Slattaratindur’s elevation, you may witness a sunset that transitions directly into sunrise. Bring a wide-angle lens and a tripod. The panoramic potential from the summit is exceptional, and a multi-row panorama can capture the full 360-degree sweep.
Kalsoy Island: The Edge of the World
Kallur Lighthouse
GPS: 62.XX°N, 6.XX°W🔒 (trailhead at Trollanes) | Hike: 2.5-3 hours round trip, moderate | Best light: Afternoon to evening
Kallur Lighthouse on the northern tip of Kalsoy is one of the most photographed locations in the Faroe Islands, and reaching it requires a ferry from Klaksvik to Sydradalur, a drive through four single-lane tunnels to Trollanes, and a moderately strenuous hike across exposed ridgelines. The effort is non-negotiable.
The lighthouse itself is a simple white and red structure. The photograph is about its context: perched on a narrow ridge with vertical cliffs dropping to the ocean on both sides, sea stacks visible in every direction, and the islands of Eysturoy and Streymoy stretching across the horizon. The composition writes itself. Walk past the lighthouse to the narrow ridgeline beyond, and shoot back toward it with the cliffs and ocean as your frame.
Lens: 24-70mm covers the full range of compositions here. Wide for the panoramic cliff-edge shots, 50-70mm for tighter lighthouse portraits against the sea stacks.
Safety: The ridgeline beyond the lighthouse has no fences and sheer drops on both sides. Wind gusts are common and unpredictable. This is not a location for distracted shooting. Plant your tripod, compose carefully, and keep your weight low.
Ferry timing: The Kalsoy ferry runs limited departures. Book early and confirm the schedule. Missing the last ferry means a very expensive water taxi or an unplanned night in Trollanes.
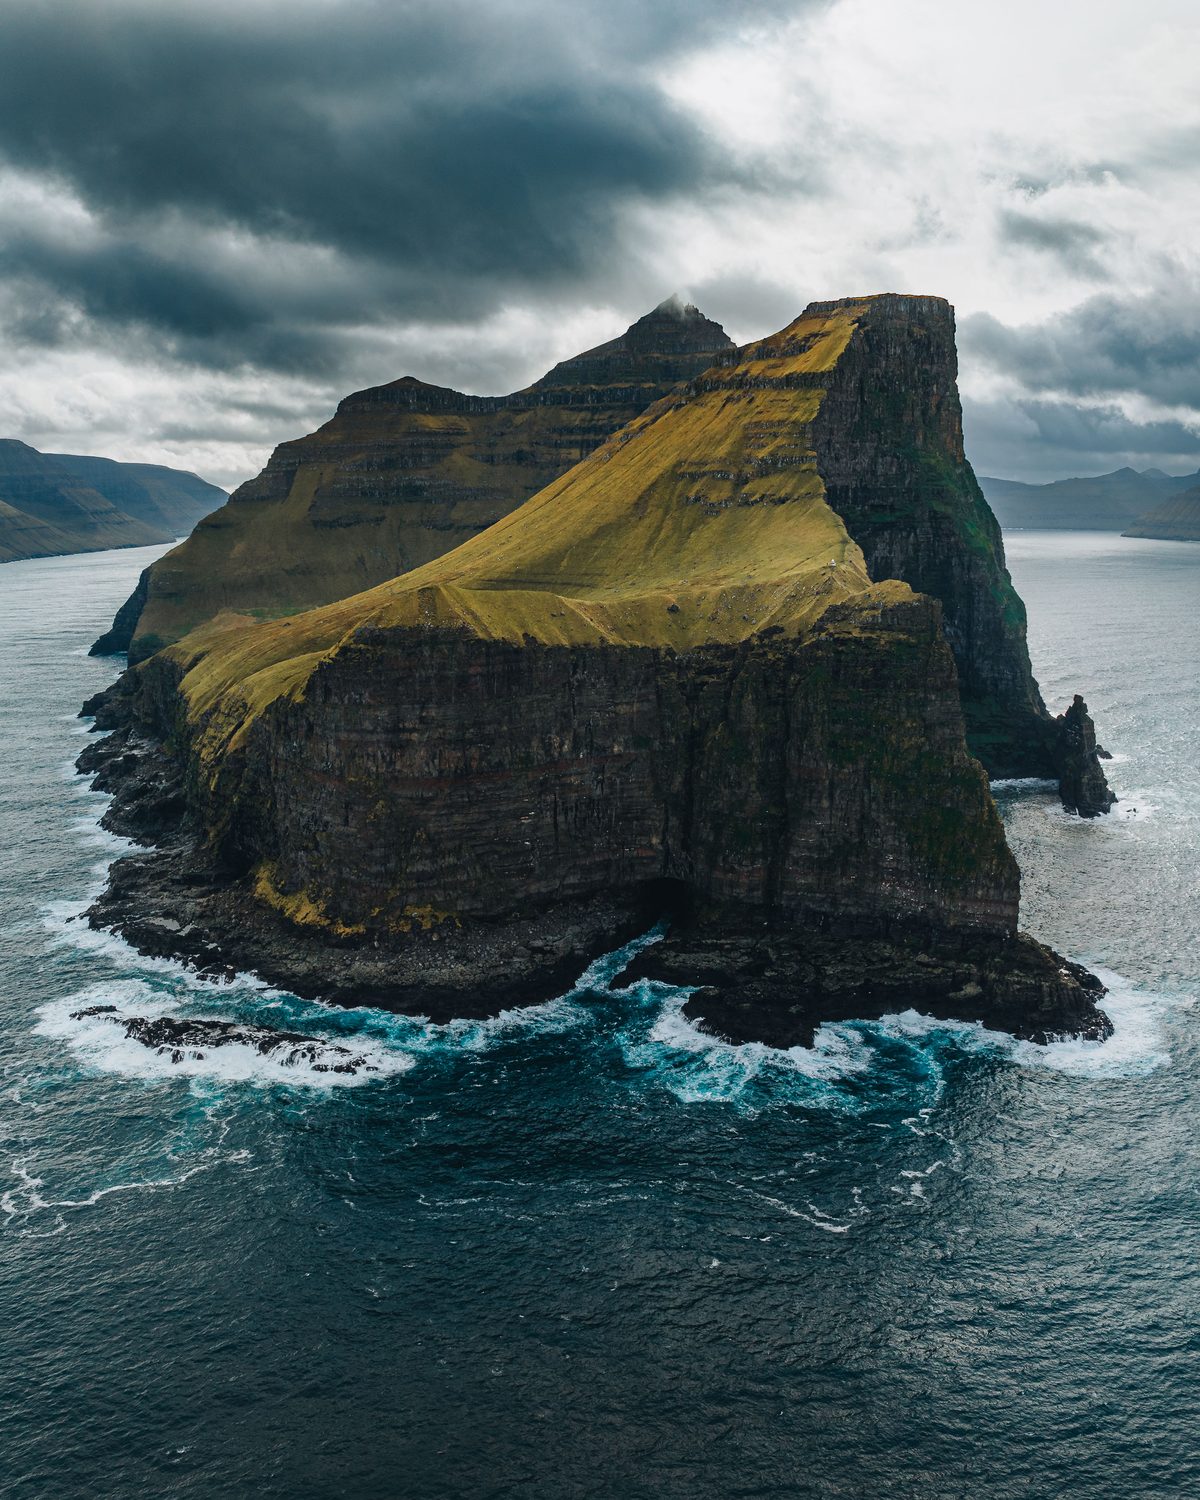
Photo: Ronald Soethje
Mikladalur and the Seal Woman
On the drive from the ferry to Trollanes, stop at Mikladalur village to photograph the Seal Woman statue (Kopakonan), a bronze sculpture on the rocks below the village depicting a figure from Faroese folklore. It is a short detour and provides a storytelling image that complements the raw landscape work.
Light Strategy: Working with 20 Hours of Daylight
In June, the Faroe Islands experience roughly 20 hours of daylight, with the sun rising around 3:30 AM and setting near 11:00 PM. True darkness never arrives. The sky remains in deep twilight through the brief “night,” and by 2:00 AM, the eastern horizon is already glowing.

The Extended Golden Hour Advantage
At 62 degrees north in June, the sun never climbs steeply. Even at solar noon, the sun angle is relatively low compared to temperate latitudes. This means the quality of light remains warm and directional for much longer. What would be a 45-minute golden hour at lower latitudes stretches into two hours or more at the Faroes in summer.
The practical impact: you do not need to rush. Sunrise golden hour runs roughly from 3:30 to 6:00 AM. Sunset golden hour stretches from 9:00 PM past 11:00 PM. Between those windows, midday light at the Faroes is softer and more workable than midday light at most destinations because the sun angle never exceeds roughly 50 degrees above the horizon.
When to Sleep
The temptation with near-24-hour daylight is to shoot constantly and sleep never. This is a mistake that leads to poor decision-making, sloppy compositions, and unsafe driving on mountain roads. Build a sleep strategy before you arrive.
Recommended rhythm: Shoot sunrise from 3:00 to 6:00 AM. Sleep from 7:00 AM to 1:00 PM. Scout and shoot midday from 2:00 to 6:00 PM. Rest and eat from 6:00 to 8:30 PM. Shoot sunset and twilight from 9:00 PM to midnight. Repeat.
This gives you roughly six hours of sleep and eight hours of active shooting per day, which is sustainable for a six-day expedition.
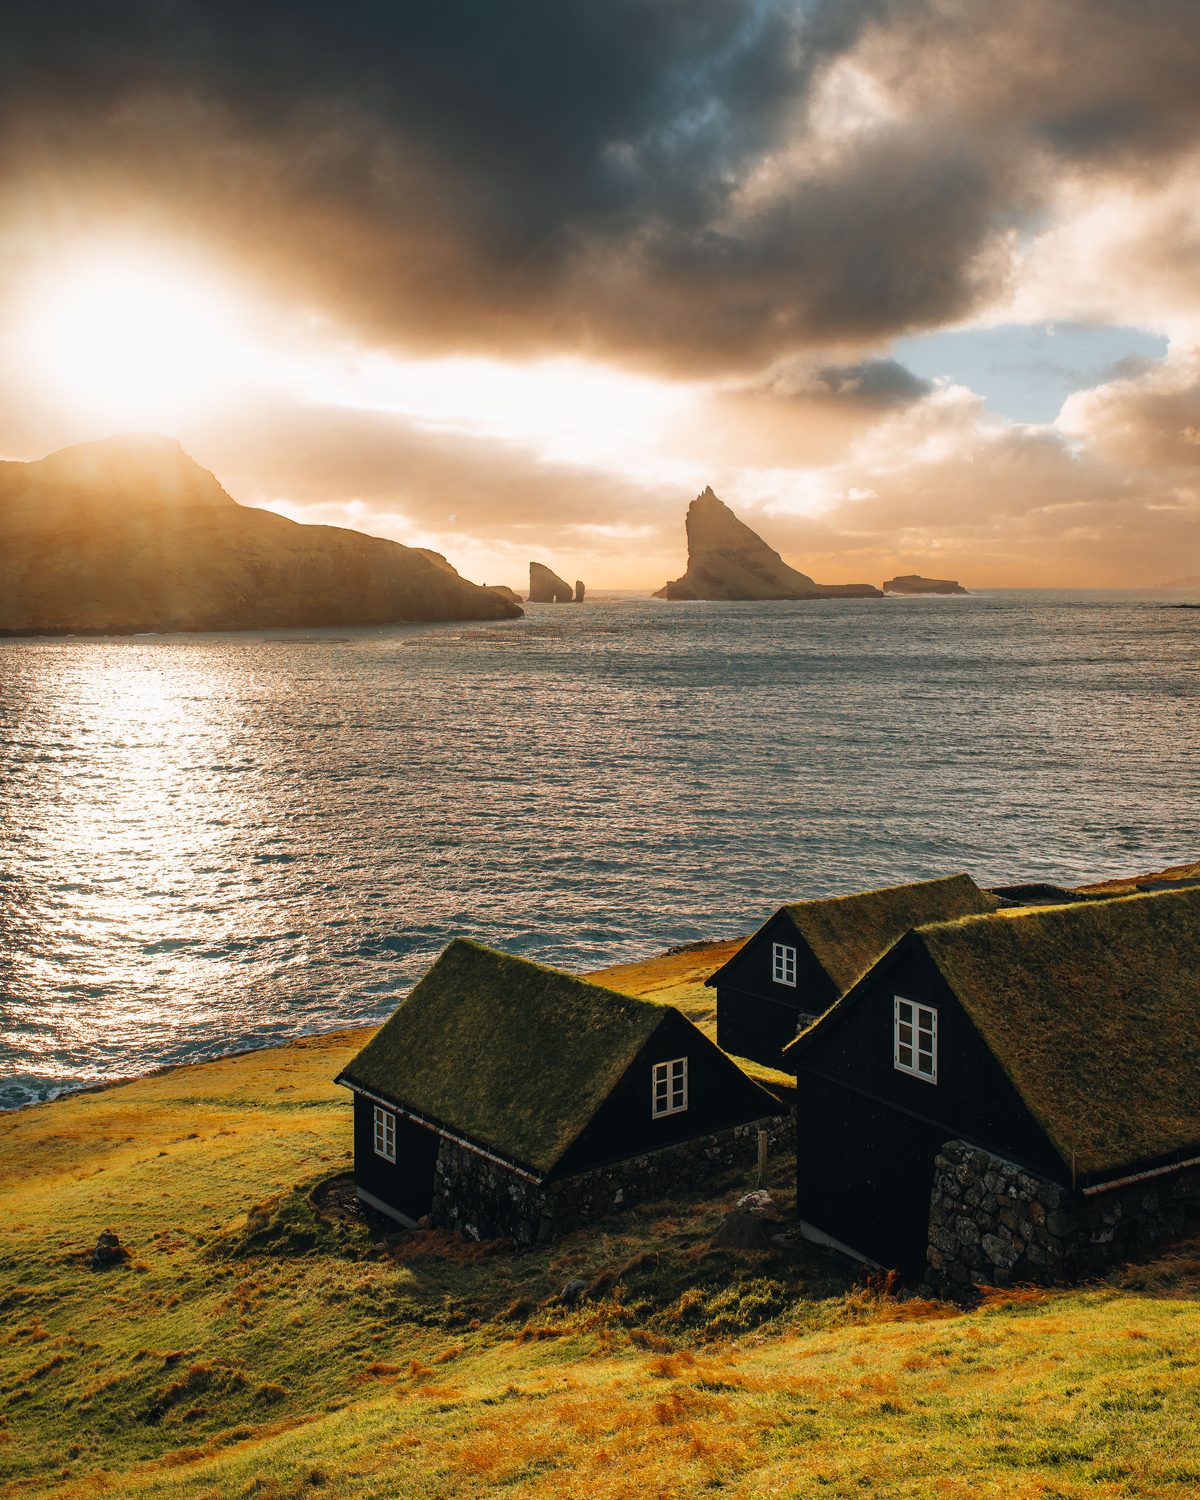
Photo: Ronald Soethje
Drone Photography in the Faroe Islands
The Faroe Islands are governed by Danish/EASA drone regulations with local additions. Understanding the rules is essential because several of the most iconic photography locations fall within restricted zones.
Key Regulations
| Rule |
Requirement |
| Max altitude |
120 meters AGL |
| Line of sight |
Required at all times |
| Night flights |
Prohibited without authorization |
| Registration |
Required for drones over 250g (Danish Transport Authority) |
| Distance from villages |
150 meters minimum from any built-up area |
| Vagar Airport (FAE) |
5 km no-fly radius |
| Bird colonies |
Prohibited during breeding season (May-August) |
| Insurance |
Recommended for all flights, mandatory for commercial |
| Penalty |
DKK 5,000 (~$725 USD) per violation |
The Traelanipa Problem
The most frustrating drone restriction for photographers: Traelanipa and Bosdalafossur fall within the 5-kilometer no-fly radius of Vagar Airport. The floating lake shot that looks spectacular from altitude in every drone video you have seen online was either shot with a permit, shot before current regulations, or shot illegally. Do not be the photographer who gets fined and makes it harder for everyone who follows.
Best Drone Opportunities
Despite the restrictions, the Faroes offer world-class aerial photography from legal launch points:
- Drangarnir and Tindholmur: Open ocean, away from all restrictions. The best aerial subject in the Faroes.
- Gjogv gorge: Fly from the coastline, keeping 150 meters from the village.
- Tjornuvik sea stacks: Launch from the beach area, maintain village distance.
- Mountain passes: Nordadalsskar and other highland roads provide unrestricted launch points with views across multiple islands.
- Mulafossur: Launch from the cliff trail south of Gasadalur, maintaining the 150-meter village buffer.
Wind Management
Wind is the primary challenge for drone photography in the Faroes. Average wind speeds of 15-30 km/h are normal, with gusts significantly higher on exposed coastlines and ridgelines. Check Windy.com before every flight. The DJI Mavic 4 Pro handles Level 6 winds (up to 30 mph), but image quality degrades in sustained wind above 20 mph as the gimbal works harder to stabilize. For sharp long-exposure aerial work, wait for a calm window, which usually arrives for brief periods even on windy days.
Weather Strategy: Expect Everything
The Faroe Islands sit at the collision point of Arctic and Gulf Stream air masses. Weather systems move through rapidly, and conditions can shift from dense fog to brilliant sunshine to sideways rain within a single hour. Average rainfall in June is 17 days out of 30.
Working With Fog
Fog is not the enemy. Some of the most atmospheric photographs from the Faroes come from foggy conditions. Fog isolates subjects, eliminates distracting backgrounds, and creates the moody, otherworldly quality that defines Faroese imagery.
When fog rolls in, switch your approach:
- Tighten compositions: Instead of wide panoramics, shoot intimate details. A turf-roofed house emerging from fog at 85mm. A sheep standing at the edge of a cliff with nothing but white behind it.
- Increase exposure compensation: Fog fools meters into underexposing. Add +0.7 to +1.0 EV to maintain brightness.
- Watch for breaks: Fog rarely persists uniformly. When holes appear and shafts of light punch through, you have a narrow window for dramatic images. Be ready. These moments last seconds.
Rain and Wind Protocol
Rain arrives horizontally in the Faroes. Keep your camera in a rain cover when not actively shooting, and dry your front element between every burst of frames. A microfiber cloth in an accessible pocket is more important than your most expensive lens.
Wind affects tripod stability at exposed locations like Traelanipa and Kallur. Lower your tripod to minimum height, hang your bag from the center column, and shield the setup with your body. On particularly gusty days, increase your ISO to allow faster shutter speeds rather than fighting tripod vibration with long exposures.
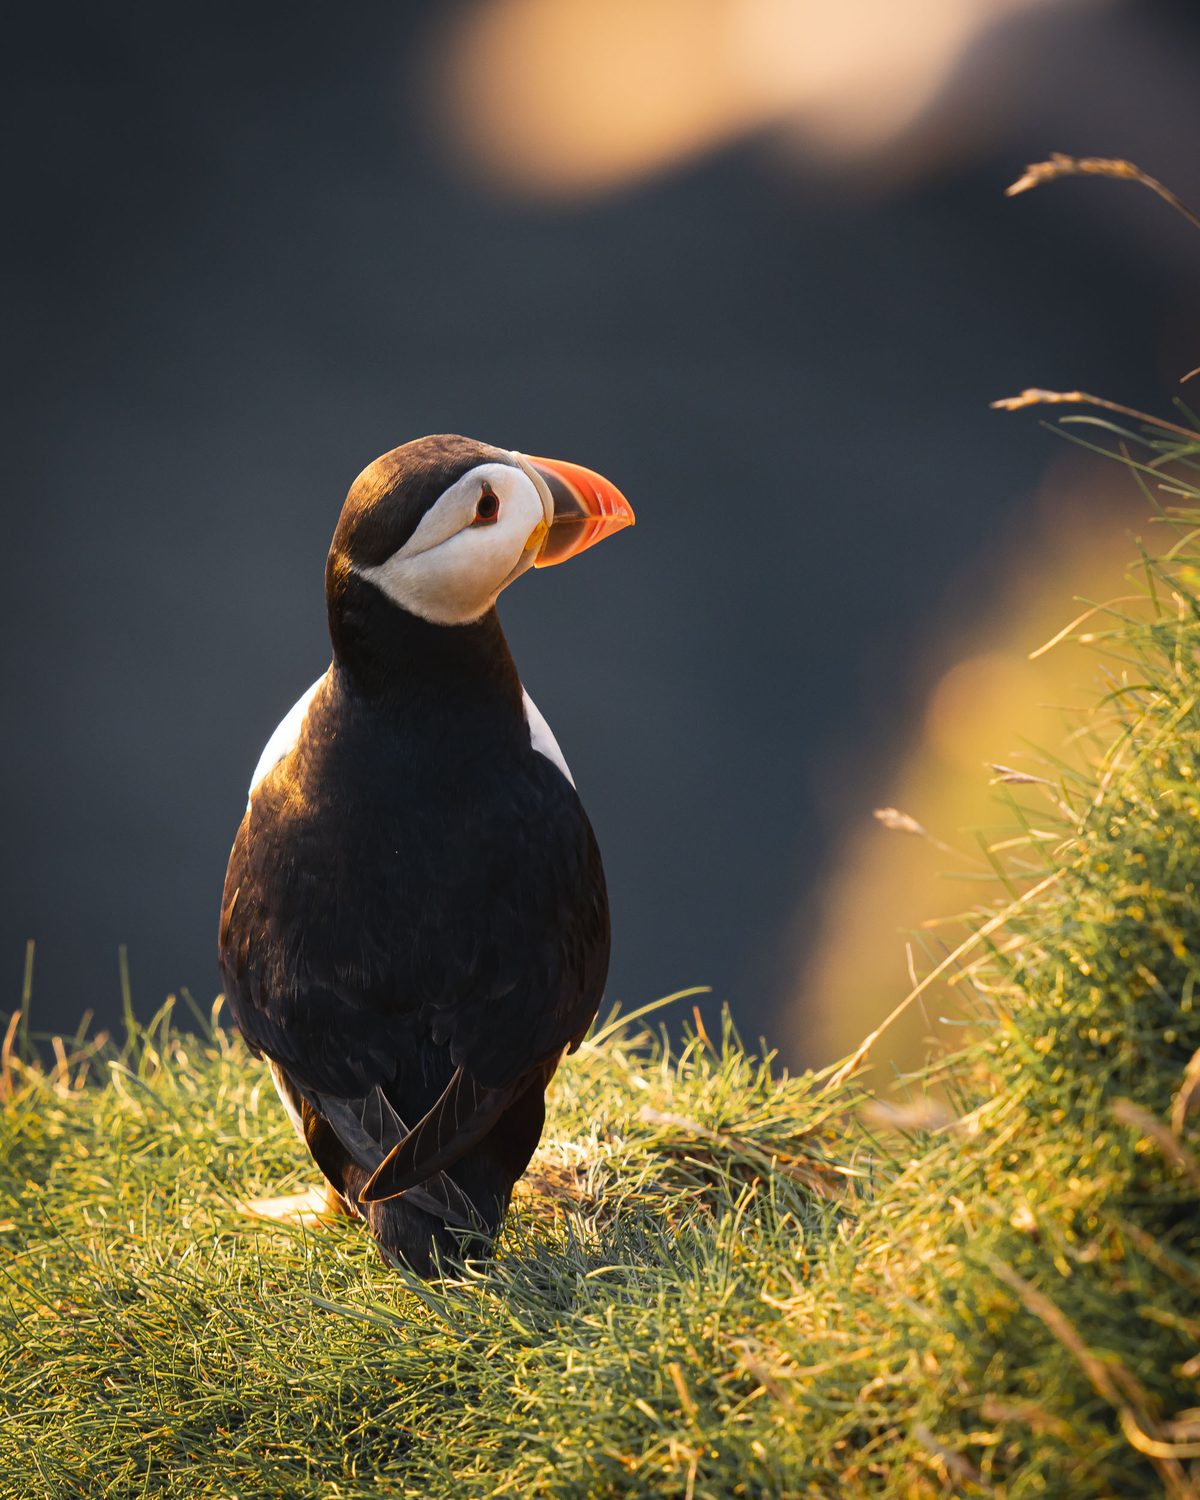
Photo: Ronald Soethje
Practical Logistics
Getting There
Fly into Vagar Airport (FAE) via Atlantic Airways from Copenhagen, Reykjavik, Edinburgh, or Bergen. The airport sits on Vagar Island, putting you within 30 minutes of the western coast photography locations.
Getting Around
Rent a car. Public transport exists but does not serve photography schedules or remote locations. Roads are excellent but narrow, with single-lane tunnels requiring headlights and passing etiquette. The subsea tunnels connecting Vagar, Streymoy, and Eysturoy mean you can reach most locations within 90 minutes of Torshavn.
Ferries connect the northern islands (Kalsoy, Vidoy, Kunoy). Check schedules and book in advance during summer. The Kalsoy ferry is especially limited and fills quickly.
Accommodation
Torshavn is the practical base, centrally located with the most options. Guesthouses and Airbnbs in smaller villages (Gjogv, Bour) put you closer to morning shooting locations but limit your flexibility.
Hiking Fees
Several key locations charge hiking access fees (typically 200 DKK / ~$30 USD): Traelanipa, Kallur Lighthouse, and others. Pay via the hiking.fo website or app. These fees fund trail maintenance and should be respected.
Gear Recommendations for the Faroes
Camera Kit
| Item |
Recommendation |
| Body |
Full-frame mirrorless (weather-sealed) |
| Wide zoom |
16-35mm f/2.8 or f/4 (primary lens) |
| Standard zoom |
24-70mm f/2.8 |
| Telephoto |
70-200mm f/2.8 (bird cliffs, sea stacks) |
| Filters |
Circular polarizer (essential), 6-stop ND, 3-stop GND |
| Tripod |
Carbon fiber, rated for wind (heavy-duty ball head) |
| Drone |
DJI Mavic 4 Pro or Air 3S (with ND filter set) |
Clothing and Protection
The Faroes demand serious weatherproofing:
- Waterproof shell jacket and trousers: Non-negotiable. Rain arrives without warning.
- Windproof mid-layer: Fleece or soft shell under the waterproof layer.
- Waterproof hiking boots: Every trail is wet. Ankle support matters on cliff edges.
- Camera rain cover: A dedicated rain sleeve or a large zip-lock bag.
- Microfiber cloths: Carry at least three. You will use them constantly for lens and filter cleaning.
- Wind-resistant tripod technique: Attach your bag to the center column hook for added stability.
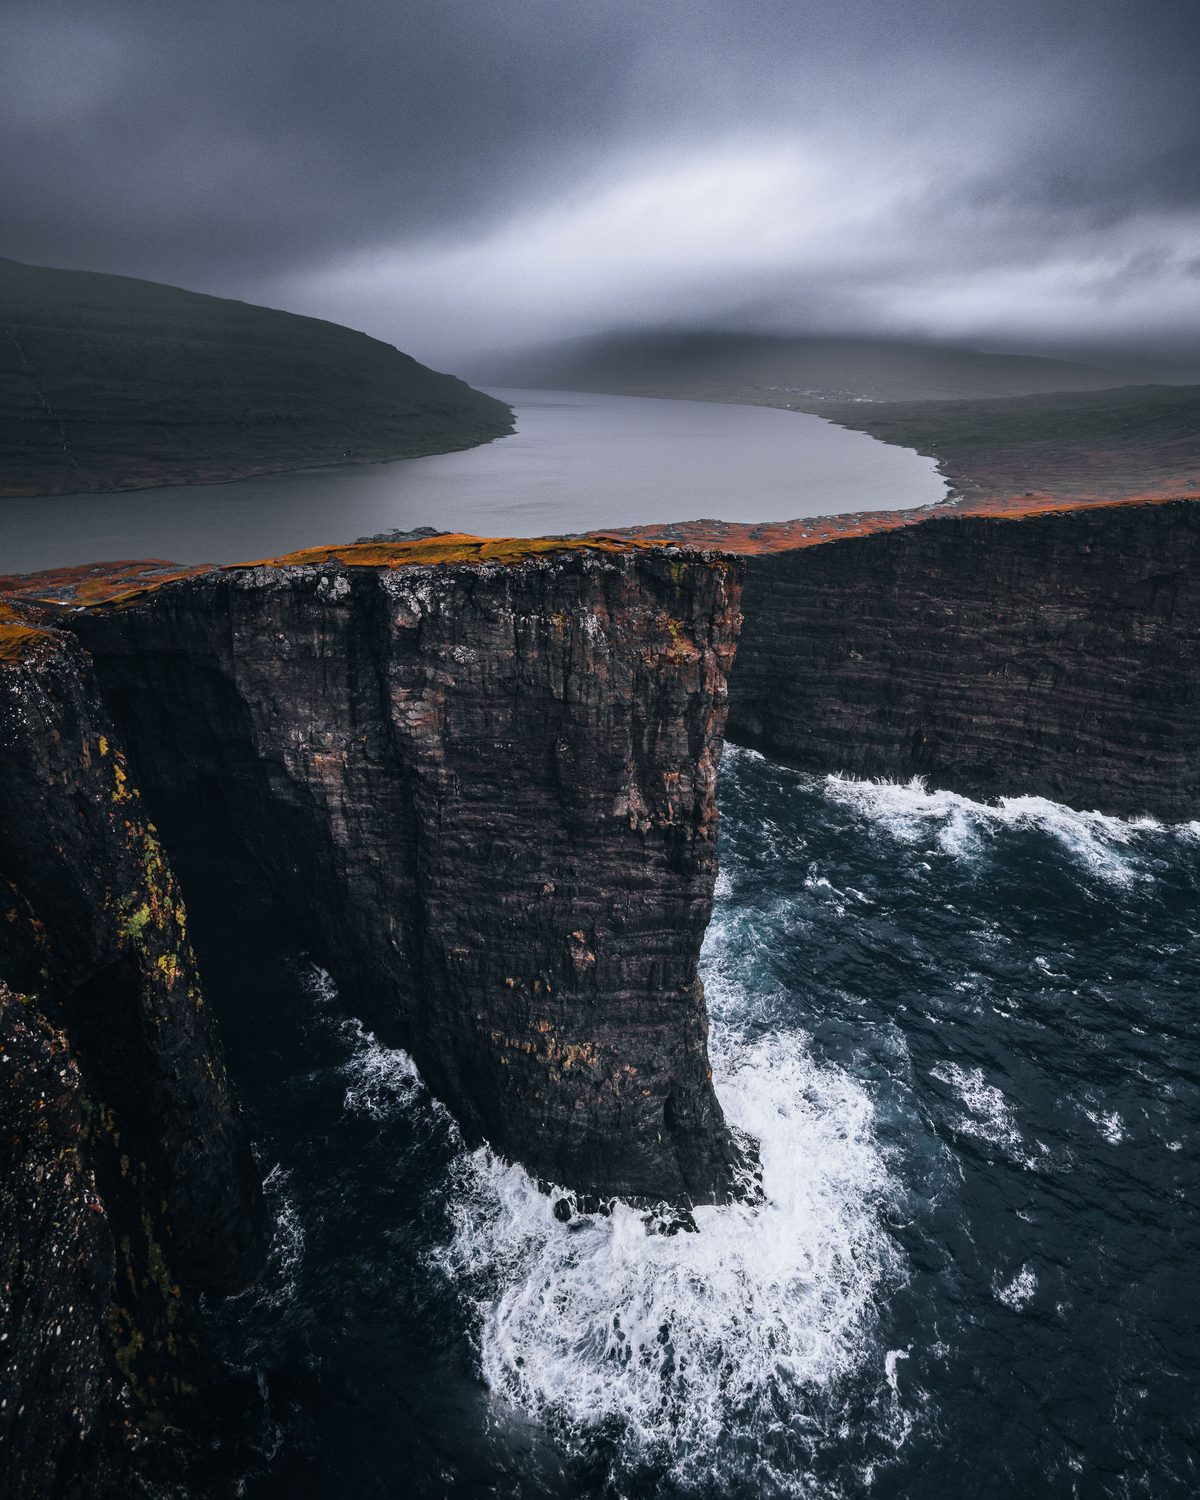
Photo: Ronald Soethje
Exercises for Faroe Islands Photography
Exercise 1: The Weather Pivot
At Gasadalur, set up your Mulafossur composition and commit to staying for one full hour regardless of conditions. Photograph every weather state: clear, cloudy, foggy, rainy. Review the set at home and identify which condition produced your strongest image. This exercise builds the patience and adaptability that the Faroes demand.
Exercise 2: The Focal Length Study
At Tjornuvik beach, photograph Risin og Kellingin at five focal lengths: 16mm, 35mm, 70mm, 135mm, and 200mm. Do not move your feet between focal lengths. Study how compression changes the relationship between the sea stacks, the beach, and the village. Identify which focal length creates the most compelling spatial relationship for this specific scene.
Visit Saksun twice in one day: once at high tide and once at low tide. At each visit, find and execute the strongest possible composition. Compare the two sessions. Understanding how tidal state transforms a location is a skill that transfers to every coastal destination you will ever photograph.
Exercise 4: Drone Altitude Bracket
At Drangarnir (or another unrestricted drone location), capture the same subject at 30m, 60m, 90m, and 120m altitude. Study how altitude changes the relationship between sea stacks, ocean texture, and the surrounding islands. Identify which altitude produces the strongest balance between subject detail and environmental context.
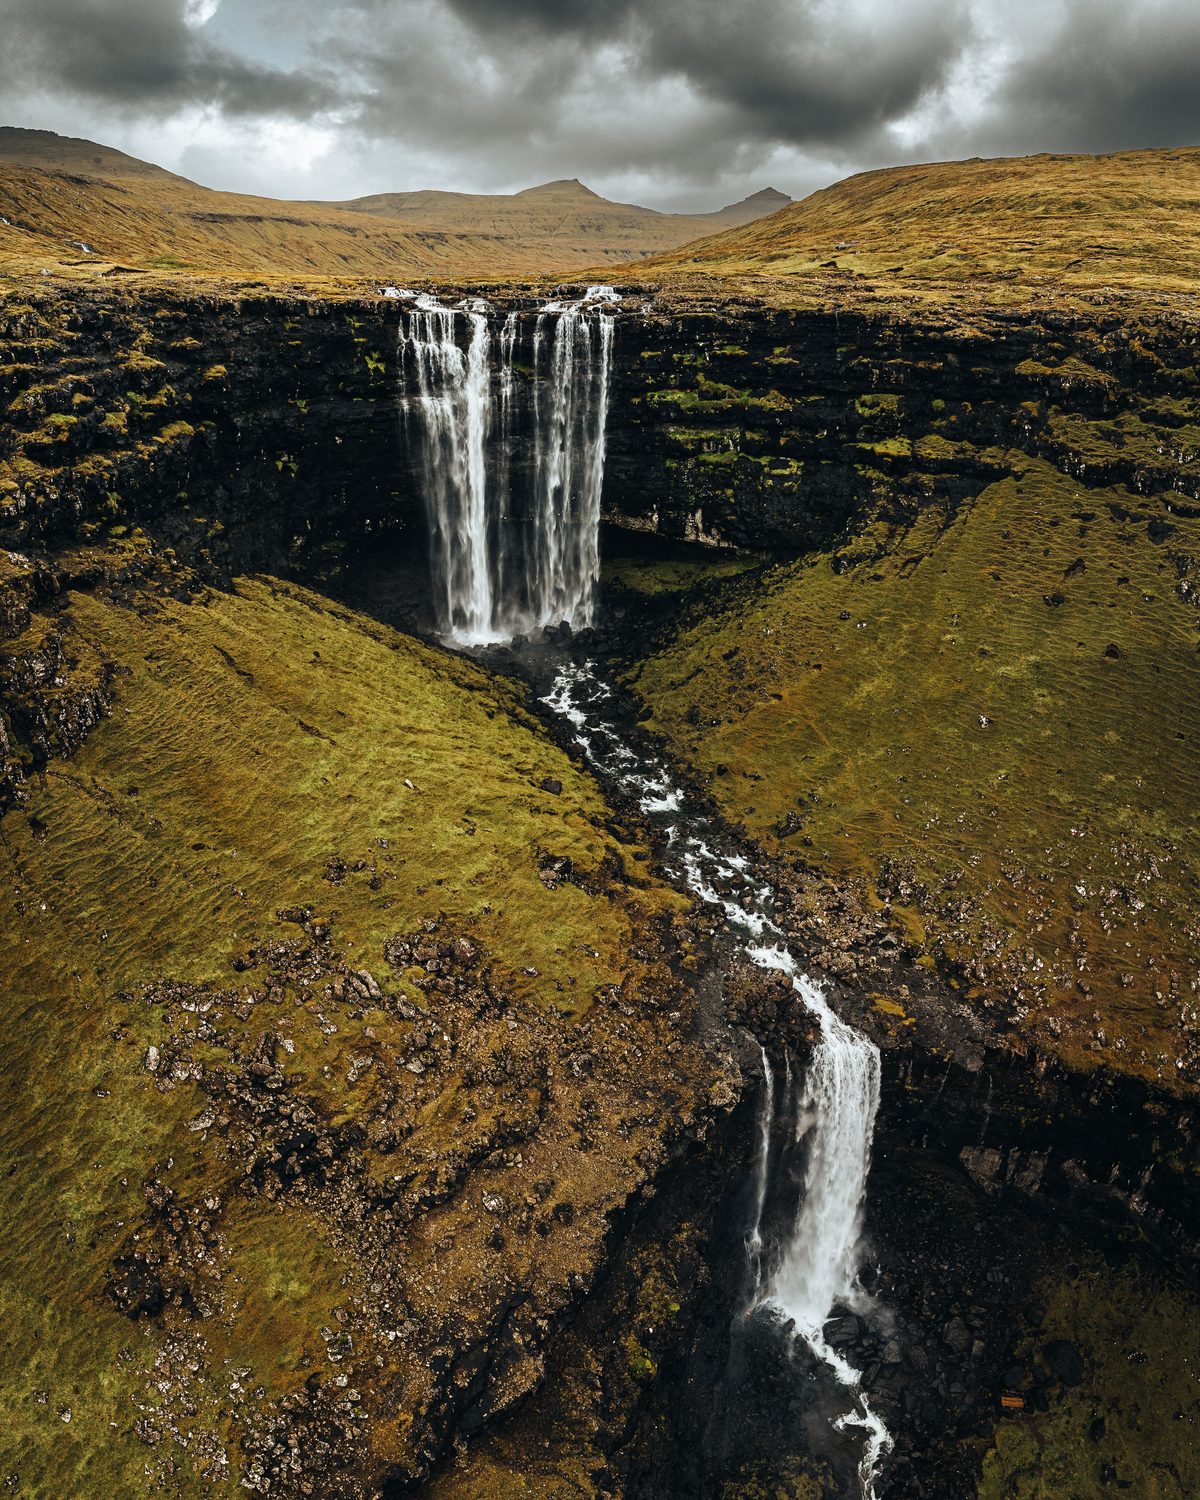
Photo: Ronald Soethje
Beyond June: Other Seasons
June offers maximum daylight and the mildest weather, but every season in the Faroes has photographic value.
| Season |
Daylight |
Conditions |
Best For |
| Winter (Dec-Feb) |
5-7 hours |
Storms, snow, dramatic skies |
Moody atmosphere, northern lights |
| Spring (Mar-May) |
12-18 hours |
Variable, greening landscape |
Puffins arrive May, waterfalls at peak flow |
| Summer (Jun-Aug) |
19-20 hours |
Mildest, fog common |
Endless golden hour, puffins, hiking access |
| Autumn (Sep-Nov) |
7-13 hours |
Increasing storms, fall colors |
Dramatic light, aurora, fewer tourists |
Winter visitors should note that many hiking trails close or become dangerous, some ferry routes reduce frequency, and daylight windows are extremely short. But the storms that batter the islands in winter produce the most dramatic seascapes and skies.
Conclusion
The Faroe Islands compress an extraordinary density of photographic subjects into a tiny landmass. You can photograph a waterfall dropping into the ocean at sunrise, sea stacks from a drone at midday, a turf-roofed village in fog at afternoon, and a black sand beach at a sunset that bleeds into the next sunrise without ever driving more than ninety minutes.
The weather will test your patience, your gear, and your adaptability. It will also hand you light and atmospheric conditions that cannot be replicated anywhere else. The photographers who succeed here are the ones who stop fighting the weather and start collaborating with it. Pack your rain gear, charge your batteries, set your alarm for 3:00 AM, and go make photographs that no other destination on Earth can give you.